> ## Documentation Index
> Fetch the complete documentation index at: https://docs.clix.so/llms.txt
> Use this file to discover all available pages before exploring further.
# SDK Quickstart - iOS
> Start sending your first notification in 10 minutes.
## Before Getting Started
### Overview
Clix leverages Firebase Cloud Messaging (FCM) to deliver notifications efficiently. The goal is to ensure a smooth integration process and reliable delivery of push notifications to your app users.
### Environment
* iOS 15.0 or later
* Swift 5.5 or later
* Xcode 16.2 or later
* Cocoapods or Swift Package Manager
[******Make sure you’ve completed the Firebase setup.******](/firebase-setting)
If the setup is complete, the following items should be in place.
1. Make sure GoogleService-Info.plist is in your project directory.
2. Upload the Service Account Key file to the Clix console.
## Setup Clix - Using CLI (Recommended)
Clix CLI is an AI-powered assistant for quick and easy SDK setup.
Use the install and doctor commands to automatically configure the required code and settings. For iOS projects, follow the CLI prompts to add the necessary files and configurations.
#### Install Clix CLI
```bash npm theme={null}
npm install -g @clix-so/clix-cli
```
```bash shell theme={null}
curl -fsSL https://cli.clix.so/install.sh | bash
```
```bash homebrew theme={null}
brew tap clix-so/clix-cli && brew install clix
```
#### Run Install Command
The install command in the Clix CLI checks for required files and configurations, and provides appropriate installation guidance through prompts.
```bash theme={null}
clix install
```
### Doctor Command
The clix doctor command checks whether the necessary code and configuration for using the Clix SDK are properly set up, and provides guidance on how to fix any issues.
```bash theme={null}
clix doctor
```
## Setup Clix - Manual Installation
Integrate Firebase and Clix to manage and send notifications effectively from
Clix console.
 Option1) Using Swift Package Manager (SPM):
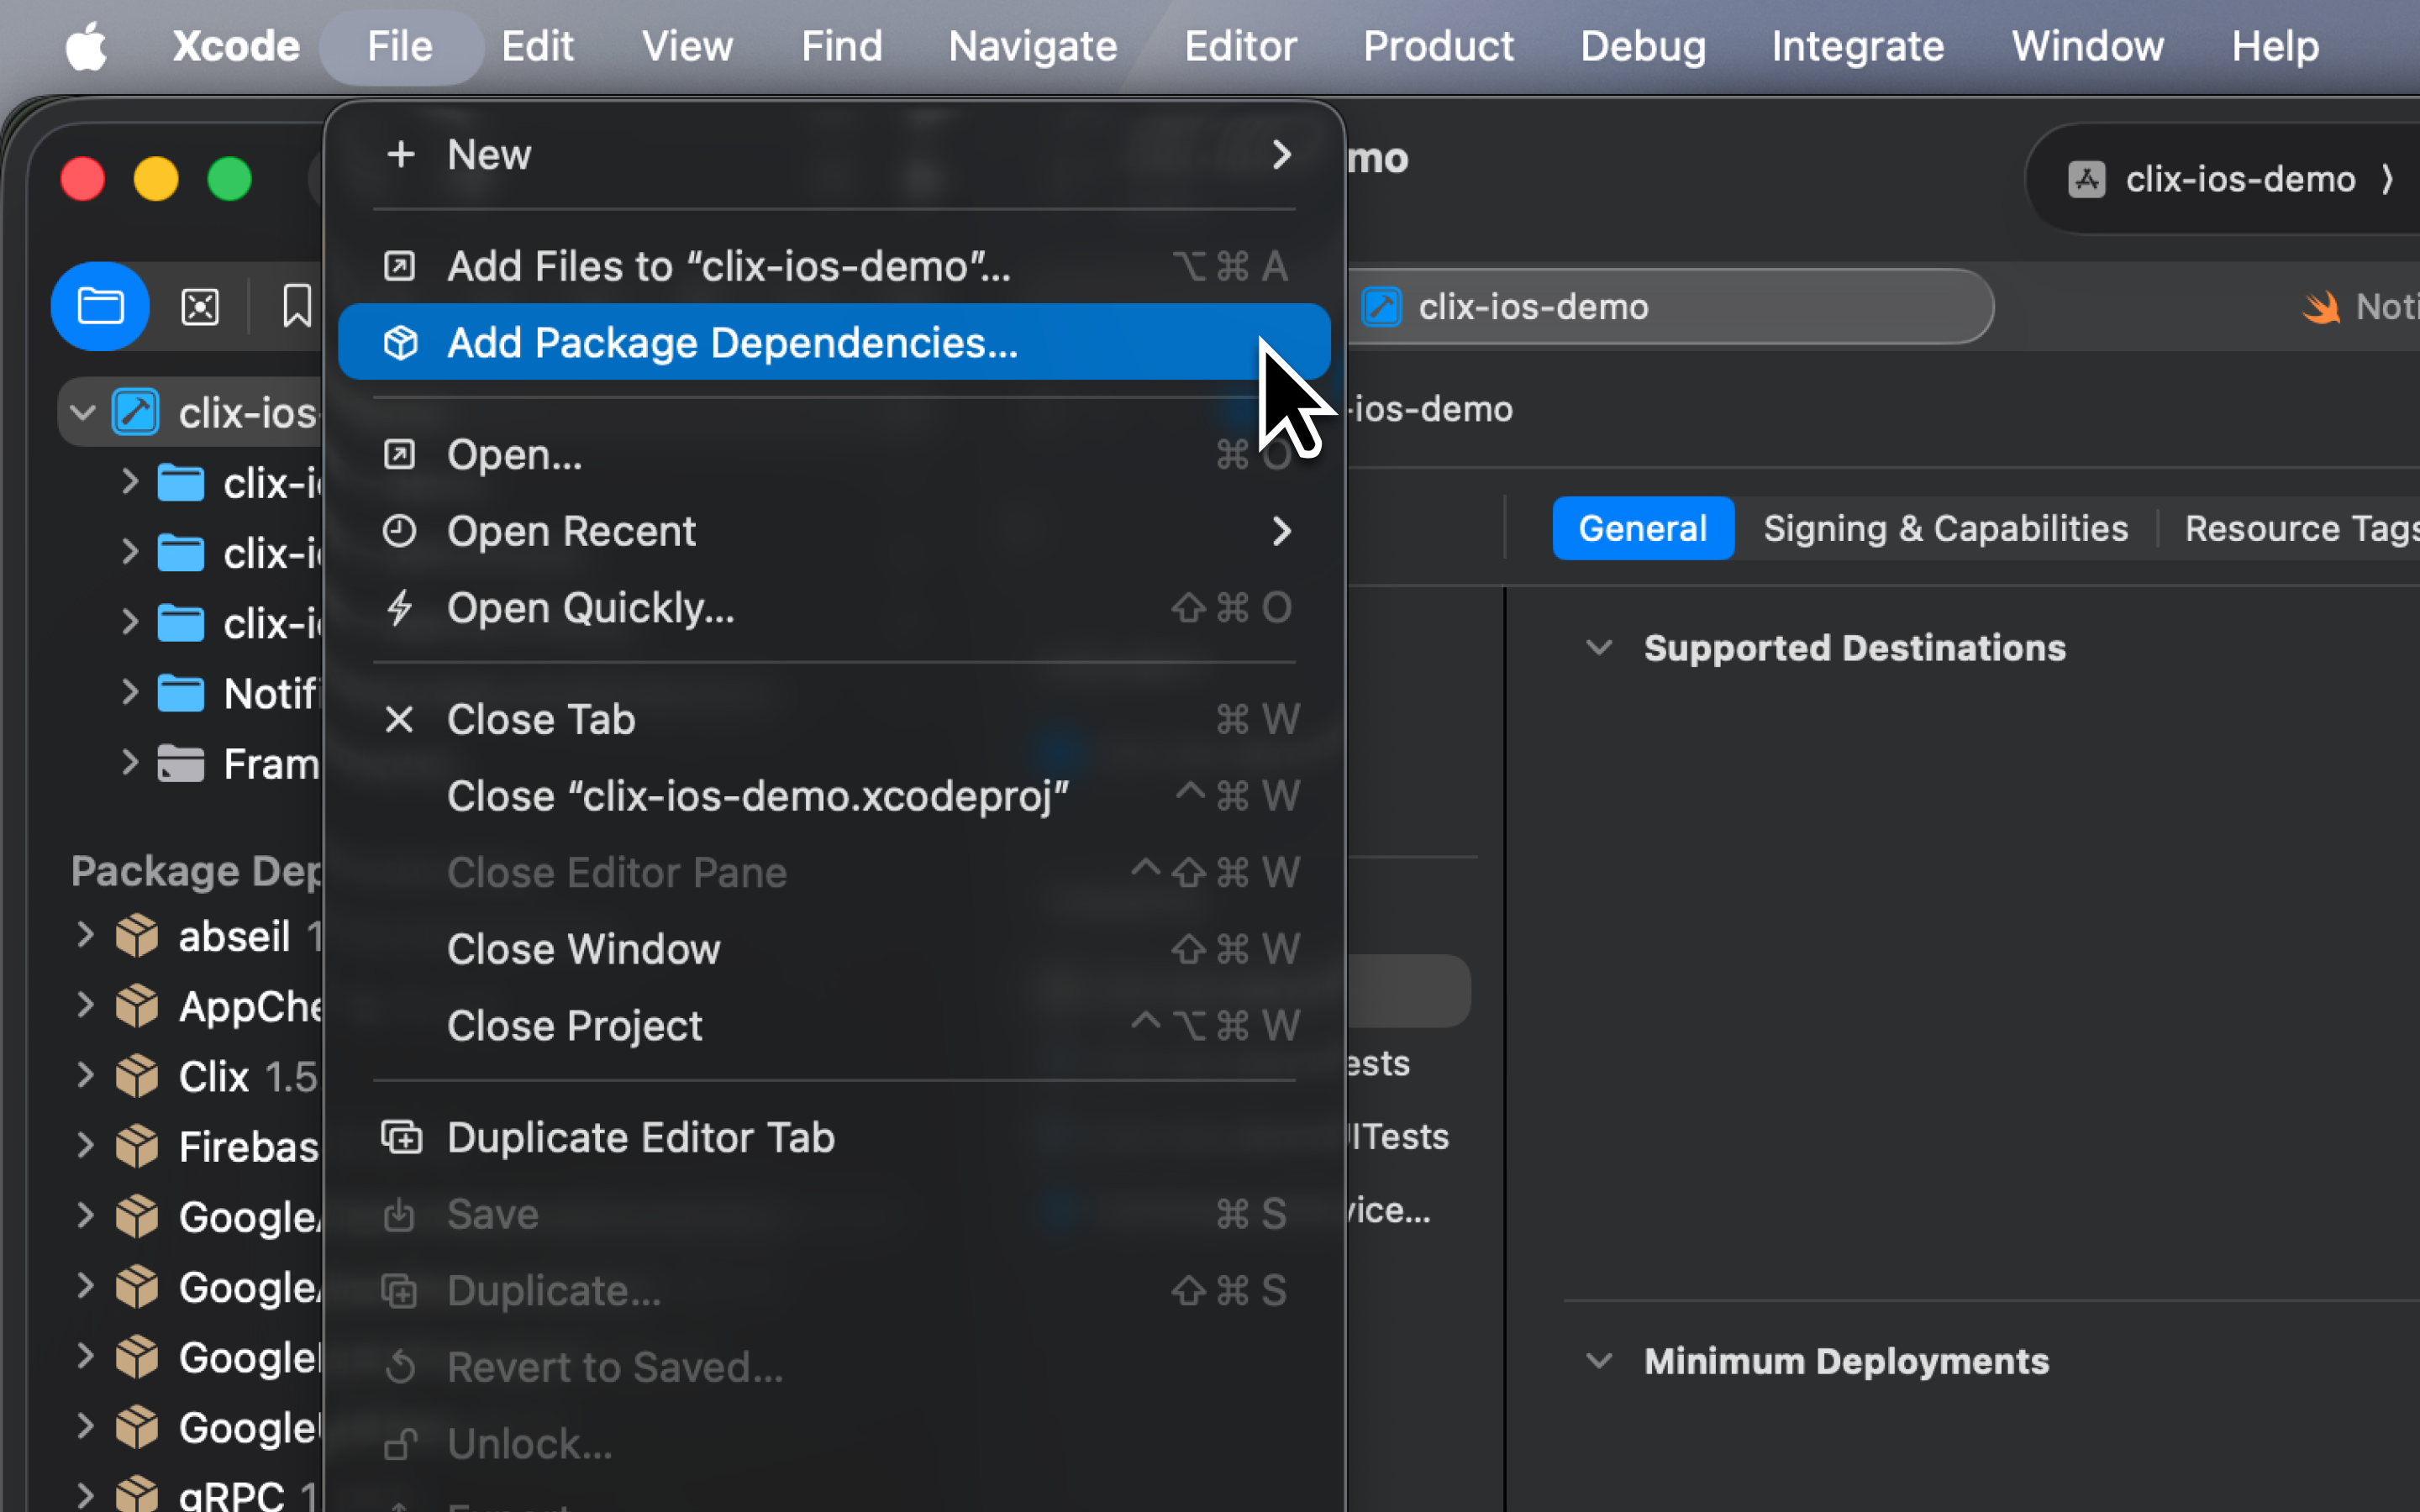
* Go to 'File' > 'Add Package Dependencies'
* Search and add **'**[**https://github.com/clix-so/clix-ios-sdk.git**](https://github.com/clix-so/clix-ios-sdk.git)**'**
* Install the package and select your main app as a target.
Option1) Using Swift Package Manager (SPM):
* Go to 'File' > 'Add Package Dependencies'
* Search and add **'**[**https://github.com/clix-so/clix-ios-sdk.git**](https://github.com/clix-so/clix-ios-sdk.git)**'**
* Install the package and select your main app as a target.
 ***
Option2) Using Pod:
* Add these lines to your `Podfile`:
```bash {2} theme={null}
# Podfile
pod 'Clix'
```
* Then run:
```bash theme={null}
pod install
```
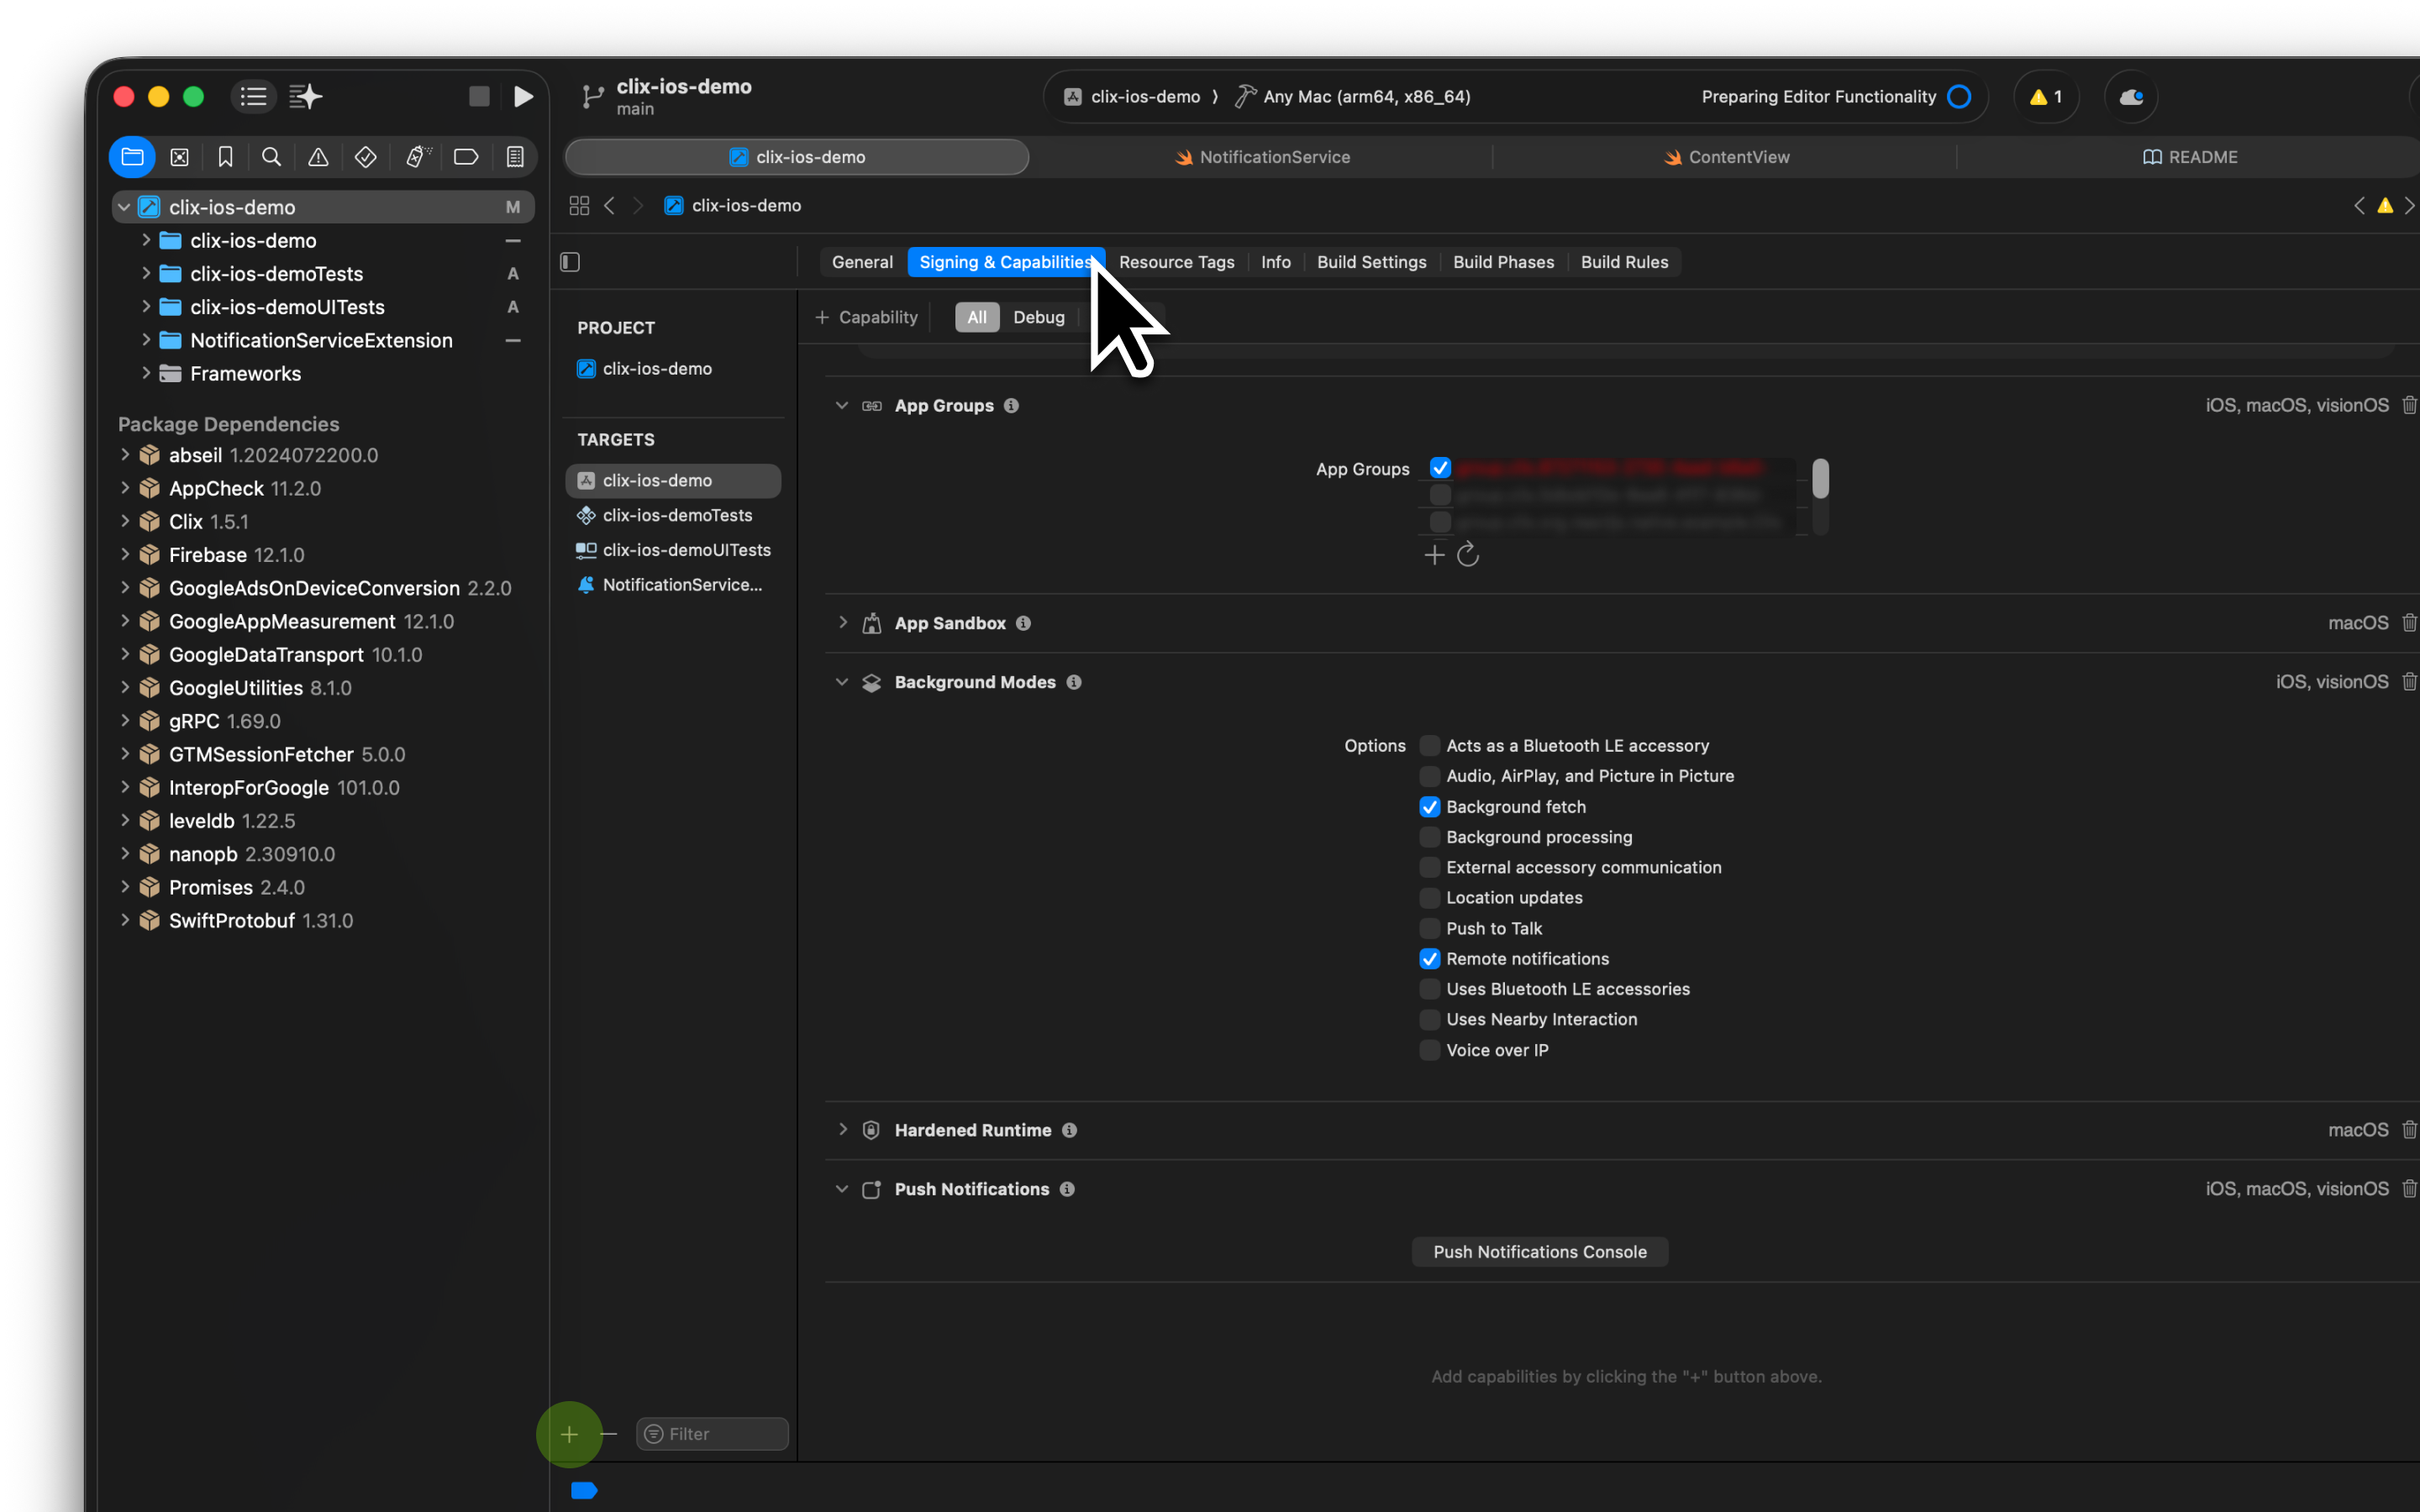
To add Push Notification Capability,
1. Select your app target.
2. Go to the **Signing & Capabilities** tab.
3. Click the **+** button and choose **Push Notification** from the list.
***
Option2) Using Pod:
* Add these lines to your `Podfile`:
```bash {2} theme={null}
# Podfile
pod 'Clix'
```
* Then run:
```bash theme={null}
pod install
```
To add Push Notification Capability,
1. Select your app target.
2. Go to the **Signing & Capabilities** tab.
3. Click the **+** button and choose **Push Notification** from the list.
 Add this code to `AppDelegate.swift` inside the `didFinishLaunchingWithOptions` method:
Ensure that your AppDelegate inherits from ClixAppDelegate.
```swift AppDelegate.swift {5,8,13,16-24,30} theme={null}
import UIKit
import Clix
import FirebaseCore
class AppDelegate: ClixAppDelegate {
// Set to true to auto-request push permissions on launch.
// Default is false - you must manually request permissions.
override var autoRequestPermission: Bool { true }
override func application(_ application: UIApplication,
didFinishLaunchingWithOptions launchOptions: [UIApplication.LaunchOptionsKey: Any]?) -> Bool {
FirebaseApp.configure()
Task {
await Clix.initialize(
config: ClixConfig(
projectId: YOUR_PROJECT_ID,
apiKey: YOUR_PUBLIC_API_KEY,
// Optional parameters:
// endpoint: "https://api.clix.so",
// logLevel: .debug,
// extraHeaders: [:]
)
)
}
return super.application(application, didFinishLaunchingWithOptions: launchOptions)
}
}
```
Run your project to verify the setup works correctly. Notifications should appear on your device as expected.
**Known Issue: iOS 26.0 Simulator**
Push notification token generation may fail on iOS 26.0 Simulator. If you encounter this issue, update to iOS 26.1 or later. See [Apple Developer Forums](https://developer.apple.com/forums/thread/797507) for details.
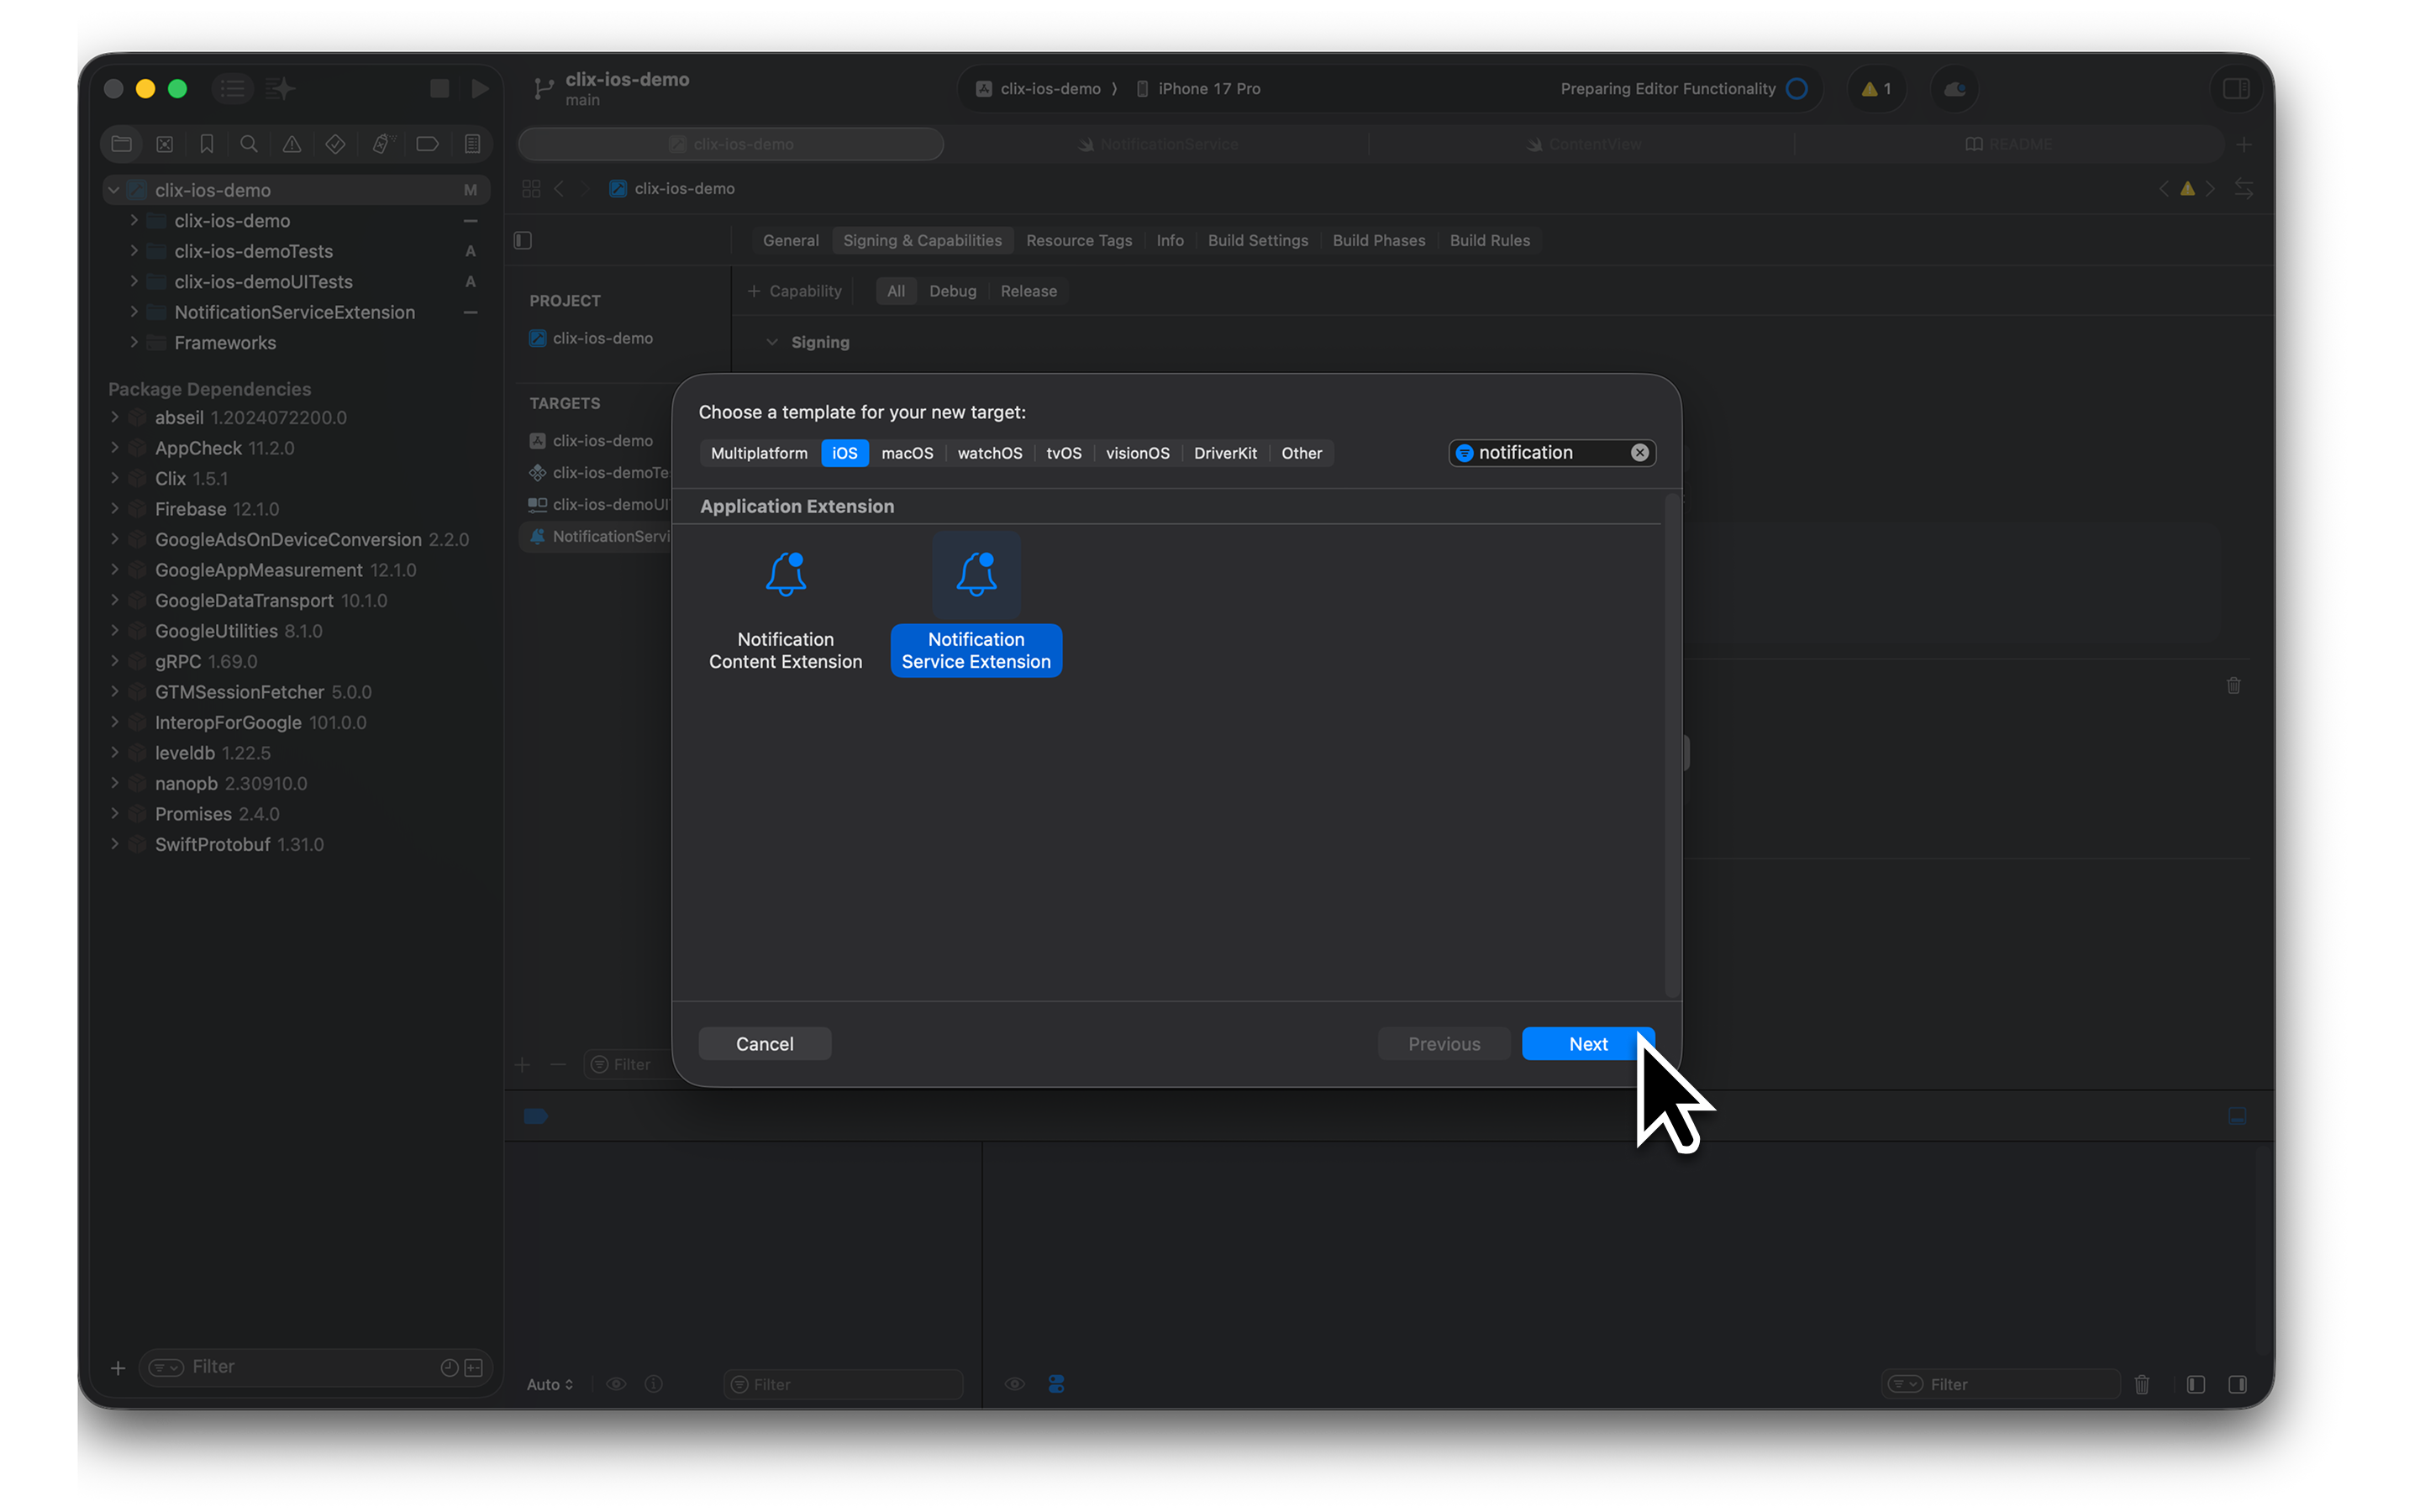
1. Create a Notification Service Extension to enhance your notification content.
2. In Xcode, choose **File > New > Target > Notification Service Extension**.
3. Name the extension **'ClixNotificationExtension'**.
Add this code to `AppDelegate.swift` inside the `didFinishLaunchingWithOptions` method:
Ensure that your AppDelegate inherits from ClixAppDelegate.
```swift AppDelegate.swift {5,8,13,16-24,30} theme={null}
import UIKit
import Clix
import FirebaseCore
class AppDelegate: ClixAppDelegate {
// Set to true to auto-request push permissions on launch.
// Default is false - you must manually request permissions.
override var autoRequestPermission: Bool { true }
override func application(_ application: UIApplication,
didFinishLaunchingWithOptions launchOptions: [UIApplication.LaunchOptionsKey: Any]?) -> Bool {
FirebaseApp.configure()
Task {
await Clix.initialize(
config: ClixConfig(
projectId: YOUR_PROJECT_ID,
apiKey: YOUR_PUBLIC_API_KEY,
// Optional parameters:
// endpoint: "https://api.clix.so",
// logLevel: .debug,
// extraHeaders: [:]
)
)
}
return super.application(application, didFinishLaunchingWithOptions: launchOptions)
}
}
```
Run your project to verify the setup works correctly. Notifications should appear on your device as expected.
**Known Issue: iOS 26.0 Simulator**
Push notification token generation may fail on iOS 26.0 Simulator. If you encounter this issue, update to iOS 26.1 or later. See [Apple Developer Forums](https://developer.apple.com/forums/thread/797507) for details.
1. Create a Notification Service Extension to enhance your notification content.
2. In Xcode, choose **File > New > Target > Notification Service Extension**.
3. Name the extension **'ClixNotificationExtension'**.
 1. Select your app target.
2. Go to the **Signing & Capabilities** tab.
3. Click the **+** button and choose App Groups from the list.
4. Click **+** under App Groups and create the App Group ID
**The App Group ID must follow this exact format:**
```bash {1} theme={null}
group.clix.YOUR_BUNDLE_ID
```
Replace `YOUR_BUNDLE_ID` with your actual app bundle identifier (e.g., `group.clix.com.yourcompany.yourapp`). This ensures MMKV can share data between your app and extensions.
5. Add the same App Group Id to the Extension target.
6. At the Extension target > 'General' > 'Frameworks, Libraries ...' , click '+' button and search and add 'Clix' to your extension target.
Add the following to your extension's `NotificationService.swift`:
Note that you have to replace YOUR\_PROJECT\_ID to your own project id. (Check out Clix Console > Setting)
```swift NotificationService.swift {6,11} theme={null}
import Clix
import UserNotifications
/// NotificationService inherits all logic from ClixNotificationServiceExtension
/// No additional logic is needed unless you want to customize notification handling.
class NotificationService: ClixNotificationServiceExtension {
// Initialize with your Clix project ID
override init() {
super.init()
// Register your Clix project ID
register(projectId: YOUR_PROJECT_ID)
}
override func didReceive(
_ request: UNNotificationRequest,
withContentHandler contentHandler: @escaping (UNNotificationContent) -> Void
) {
// Call super to handle image downloading and send push received event
super.didReceive(request, withContentHandler: contentHandler)
}
override func serviceExtensionTimeWillExpire() {
super.serviceExtensionTimeWillExpire()
}
}
```
Run your project to verify the setup works correctly. Go to Clix console > Test Console, find the registered device, send a push message, and check if the message is received properly on the device. Also, make sure the push events are being tracked in real time.
By default, `autoRequestPermission` is set to `false`, meaning the SDK will NOT automatically request push notification permissions.
**Option 1: Enable Auto-Request**
Override `autoRequestPermission` in your AppDelegate to automatically request permissions on launch:
```swift {2} theme={null}
class AppDelegate: ClixAppDelegate {
override var autoRequestPermission: Bool { true }
// ... rest of your code
}
```
**Option 2: Manual Permission Request**
If you want to control when the permission prompt appears (e.g., after onboarding), keep the default and call:
```swift {1} theme={null}
Clix.Notification.requestPermission()
```
**Option 3: Native Permission Handling**
If you handle permissions natively, you must notify Clix of the permission status:
```swift {8} theme={null}
UNUserNotificationCenter.current().requestAuthorization(options: [.alert, .sound, .badge]) { granted, error in
if let error = error {
print("Permission request error: \(error)")
return
}
// Notify Clix SDK about permission status
Clix.Notification.setPermissionGranted(granted)
if granted {
DispatchQueue.main.async {
UIApplication.shared.registerForRemoteNotifications()
}
}
}
```
If `autoRequestPermission` is `false` and you don't call `Clix.Notification.setPermissionGranted(_:)` after handling permissions natively, the Clix server won't know the user's permission status, which may affect campaign targeting.
## Post-installation Checklist
After installing and wiring the SDK, review the following critical points to
avoid subtle runtime issues and ensure Clix can manage push notifications
correctly.
```swift AppDelegate.swift (Correct Order) {5,7,13,16-26,30} theme={null}
import UIKit
import Clix
import FirebaseCore
class AppDelegate: ClixAppDelegate {
// Set to true to auto-request push permissions on launch (default: false)
override var autoRequestPermission: Bool { true }
override func application(_ application: UIApplication,
didFinishLaunchingWithOptions launchOptions: [UIApplication.LaunchOptionsKey: Any]?) -> Bool {
// 1. Always configure Firebase first
FirebaseApp.configure()
// 2. Then initialize Clix (async-safe)
Task {
await Clix.initialize(
config: ClixConfig(
projectId: YOUR_PROJECT_ID,
apiKey: YOUR_PUBLIC_API_KEY,
// Optional parameters:
// endpoint: "https://api.clix.so",
// logLevel: .debug,
// extraHeaders: [:]
)
)
}
// 3. Return super at the very end (lets Clix finalize delegates & observers)
return super.application(application, didFinishLaunchingWithOptions: launchOptions)
}
}
```
```swift AppDelegate.swift (Incorrect - Clix before Firebase) {1-2} theme={null}
FirebaseApp.configure() // ❌ Missing (or comes after Clix)
Task { await Clix.initialize(config: /* ... */) } // Will fail if Firebase not ready
```
```swift AppDelegate.swift (Incorrect - super called first) {2} theme={null}
override func application(_ application: UIApplication, didFinishLaunchingWithOptions launchOptions: ...) -> Bool {
let ok = super.application(application, didFinishLaunchingWithOptions: launchOptions) // ❌ super too early
FirebaseApp.configure()
Task { await Clix.initialize(config: /* ... */) }
return ok
}
```
```swift AppDelegate.swift (Incorrect - manual delegate assignments) {7-8} theme={null}
import FirebaseMessaging
import UserNotifications
override func application(_ application: UIApplication, didFinishLaunchingWithOptions launchOptions: ...) -> Bool {
FirebaseApp.configure()
// ❌ Remove these. ClixAppDelegate manages them internally.
UNUserNotificationCenter.current().delegate = self
Messaging.messaging().delegate = self
return super.application(application, didFinishLaunchingWithOptions: launchOptions)
}
```
**Initialize Clix after FirebaseApp.configure()**
Reason: Clix relies on Firebase Messaging. If Firebase isn't configured
first, FCM token retrieval and registration can fail.
**Call super at the very end of each overridden lifecycle method inherited
from ClixAppDelegate / ClixNotificationServiceExtension**
Reason: Clix's super implementation finalizes delegate setup, event
tracking, and background handling. Calling it early can overwrite or miss
your custom logic; omitting it breaks internal hooks.
**Remove manual assignments to Messaging.messaging().delegate and
UNUserNotificationCenter.current().delegate**
Reason: Clix sets these delegates internally. Reassigning them can prevent
delivery receipts, media attachment handling, or token sync.
If you must implement your own delegate methods (e.g., for foreground
presentation), do it in your AppDelegate subclass but still avoid reassigning
the delegates. Clix forwards relevant delegate callbacks so your overrides
continue to work.
Need to confirm things are correct? Run
`clix doctor` again — it re-validates configuration and highlights missing steps.
### Quick Self-Test
1. Launch the app cold start: verify no console errors about FCM or missing projectId.
2. Send a test push: confirm receipt and event tracking in the Clix Console (real-time events panel).
3. Foreground push: ensure notification presentation logic still works without manual delegate assignments.
If any step fails, re-check the checklist above before deeper debugging.
You need to set up Firebase before you start integrating it into your
project.
If you'd like to see a working example, check out our sample project.
1. Select your app target.
2. Go to the **Signing & Capabilities** tab.
3. Click the **+** button and choose App Groups from the list.
4. Click **+** under App Groups and create the App Group ID
**The App Group ID must follow this exact format:**
```bash {1} theme={null}
group.clix.YOUR_BUNDLE_ID
```
Replace `YOUR_BUNDLE_ID` with your actual app bundle identifier (e.g., `group.clix.com.yourcompany.yourapp`). This ensures MMKV can share data between your app and extensions.
5. Add the same App Group Id to the Extension target.
6. At the Extension target > 'General' > 'Frameworks, Libraries ...' , click '+' button and search and add 'Clix' to your extension target.
Add the following to your extension's `NotificationService.swift`:
Note that you have to replace YOUR\_PROJECT\_ID to your own project id. (Check out Clix Console > Setting)
```swift NotificationService.swift {6,11} theme={null}
import Clix
import UserNotifications
/// NotificationService inherits all logic from ClixNotificationServiceExtension
/// No additional logic is needed unless you want to customize notification handling.
class NotificationService: ClixNotificationServiceExtension {
// Initialize with your Clix project ID
override init() {
super.init()
// Register your Clix project ID
register(projectId: YOUR_PROJECT_ID)
}
override func didReceive(
_ request: UNNotificationRequest,
withContentHandler contentHandler: @escaping (UNNotificationContent) -> Void
) {
// Call super to handle image downloading and send push received event
super.didReceive(request, withContentHandler: contentHandler)
}
override func serviceExtensionTimeWillExpire() {
super.serviceExtensionTimeWillExpire()
}
}
```
Run your project to verify the setup works correctly. Go to Clix console > Test Console, find the registered device, send a push message, and check if the message is received properly on the device. Also, make sure the push events are being tracked in real time.
By default, `autoRequestPermission` is set to `false`, meaning the SDK will NOT automatically request push notification permissions.
**Option 1: Enable Auto-Request**
Override `autoRequestPermission` in your AppDelegate to automatically request permissions on launch:
```swift {2} theme={null}
class AppDelegate: ClixAppDelegate {
override var autoRequestPermission: Bool { true }
// ... rest of your code
}
```
**Option 2: Manual Permission Request**
If you want to control when the permission prompt appears (e.g., after onboarding), keep the default and call:
```swift {1} theme={null}
Clix.Notification.requestPermission()
```
**Option 3: Native Permission Handling**
If you handle permissions natively, you must notify Clix of the permission status:
```swift {8} theme={null}
UNUserNotificationCenter.current().requestAuthorization(options: [.alert, .sound, .badge]) { granted, error in
if let error = error {
print("Permission request error: \(error)")
return
}
// Notify Clix SDK about permission status
Clix.Notification.setPermissionGranted(granted)
if granted {
DispatchQueue.main.async {
UIApplication.shared.registerForRemoteNotifications()
}
}
}
```
If `autoRequestPermission` is `false` and you don't call `Clix.Notification.setPermissionGranted(_:)` after handling permissions natively, the Clix server won't know the user's permission status, which may affect campaign targeting.
## Post-installation Checklist
After installing and wiring the SDK, review the following critical points to
avoid subtle runtime issues and ensure Clix can manage push notifications
correctly.
```swift AppDelegate.swift (Correct Order) {5,7,13,16-26,30} theme={null}
import UIKit
import Clix
import FirebaseCore
class AppDelegate: ClixAppDelegate {
// Set to true to auto-request push permissions on launch (default: false)
override var autoRequestPermission: Bool { true }
override func application(_ application: UIApplication,
didFinishLaunchingWithOptions launchOptions: [UIApplication.LaunchOptionsKey: Any]?) -> Bool {
// 1. Always configure Firebase first
FirebaseApp.configure()
// 2. Then initialize Clix (async-safe)
Task {
await Clix.initialize(
config: ClixConfig(
projectId: YOUR_PROJECT_ID,
apiKey: YOUR_PUBLIC_API_KEY,
// Optional parameters:
// endpoint: "https://api.clix.so",
// logLevel: .debug,
// extraHeaders: [:]
)
)
}
// 3. Return super at the very end (lets Clix finalize delegates & observers)
return super.application(application, didFinishLaunchingWithOptions: launchOptions)
}
}
```
```swift AppDelegate.swift (Incorrect - Clix before Firebase) {1-2} theme={null}
FirebaseApp.configure() // ❌ Missing (or comes after Clix)
Task { await Clix.initialize(config: /* ... */) } // Will fail if Firebase not ready
```
```swift AppDelegate.swift (Incorrect - super called first) {2} theme={null}
override func application(_ application: UIApplication, didFinishLaunchingWithOptions launchOptions: ...) -> Bool {
let ok = super.application(application, didFinishLaunchingWithOptions: launchOptions) // ❌ super too early
FirebaseApp.configure()
Task { await Clix.initialize(config: /* ... */) }
return ok
}
```
```swift AppDelegate.swift (Incorrect - manual delegate assignments) {7-8} theme={null}
import FirebaseMessaging
import UserNotifications
override func application(_ application: UIApplication, didFinishLaunchingWithOptions launchOptions: ...) -> Bool {
FirebaseApp.configure()
// ❌ Remove these. ClixAppDelegate manages them internally.
UNUserNotificationCenter.current().delegate = self
Messaging.messaging().delegate = self
return super.application(application, didFinishLaunchingWithOptions: launchOptions)
}
```
**Initialize Clix after FirebaseApp.configure()**
Reason: Clix relies on Firebase Messaging. If Firebase isn't configured
first, FCM token retrieval and registration can fail.
**Call super at the very end of each overridden lifecycle method inherited
from ClixAppDelegate / ClixNotificationServiceExtension**
Reason: Clix's super implementation finalizes delegate setup, event
tracking, and background handling. Calling it early can overwrite or miss
your custom logic; omitting it breaks internal hooks.
**Remove manual assignments to Messaging.messaging().delegate and
UNUserNotificationCenter.current().delegate**
Reason: Clix sets these delegates internally. Reassigning them can prevent
delivery receipts, media attachment handling, or token sync.
If you must implement your own delegate methods (e.g., for foreground
presentation), do it in your AppDelegate subclass but still avoid reassigning
the delegates. Clix forwards relevant delegate callbacks so your overrides
continue to work.
Need to confirm things are correct? Run
`clix doctor` again — it re-validates configuration and highlights missing steps.
### Quick Self-Test
1. Launch the app cold start: verify no console errors about FCM or missing projectId.
2. Send a test push: confirm receipt and event tracking in the Clix Console (real-time events panel).
3. Foreground push: ensure notification presentation logic still works without manual delegate assignments.
If any step fails, re-check the checklist above before deeper debugging.
You need to set up Firebase before you start integrating it into your
project.
If you'd like to see a working example, check out our sample project.