> ## Documentation Index
> Fetch the complete documentation index at: https://docs.clix.so/llms.txt
> Use this file to discover all available pages before exploring further.
# iOS Notification Service Extension
> Guide for adding iOS Notification Service Extension to hybrid apps (React Native, Flutter) to support rich push notifications and push reception event tracking.
## Overview
**This guide is only for hybrid apps using React Native or Flutter.**
If you are developing a native iOS app, please refer to the [SDK Quickstart - iOS](/sdk-quickstart-ios) guide.
For hybrid apps built with React Native or Flutter, you must install an iOS-specific Notification Service Extension (NSE) to enable the following features:
* **Rich push notifications with images**
* **Push reception event tracking and analytics**
A Notification Service Extension is a native iOS extension that allows you to
modify notification content or download images before the notification is
displayed to the user.
## Prerequisites
### Environment
* Xcode 16.2 or later
* CocoaPods or Swift Package Manager
* Access to your React Native or Flutter project's iOS folder
[Make sure you've completed the Firebase setup.](/firebase-setting)
Verify that the following items are in place:
1. GoogleService-Info.plist is included in your iOS project
2. Service Account Key file is uploaded to the Clix console
## Installation Guide
Add the necessary capability to enable your app to receive push notifications.
1. Select your **main app target** in Xcode.
2. Navigate to the **Signing & Capabilities** tab.
3. Click the **+ Capability** button in the top-left corner.
4. Find and add **Push Notifications** from the list.
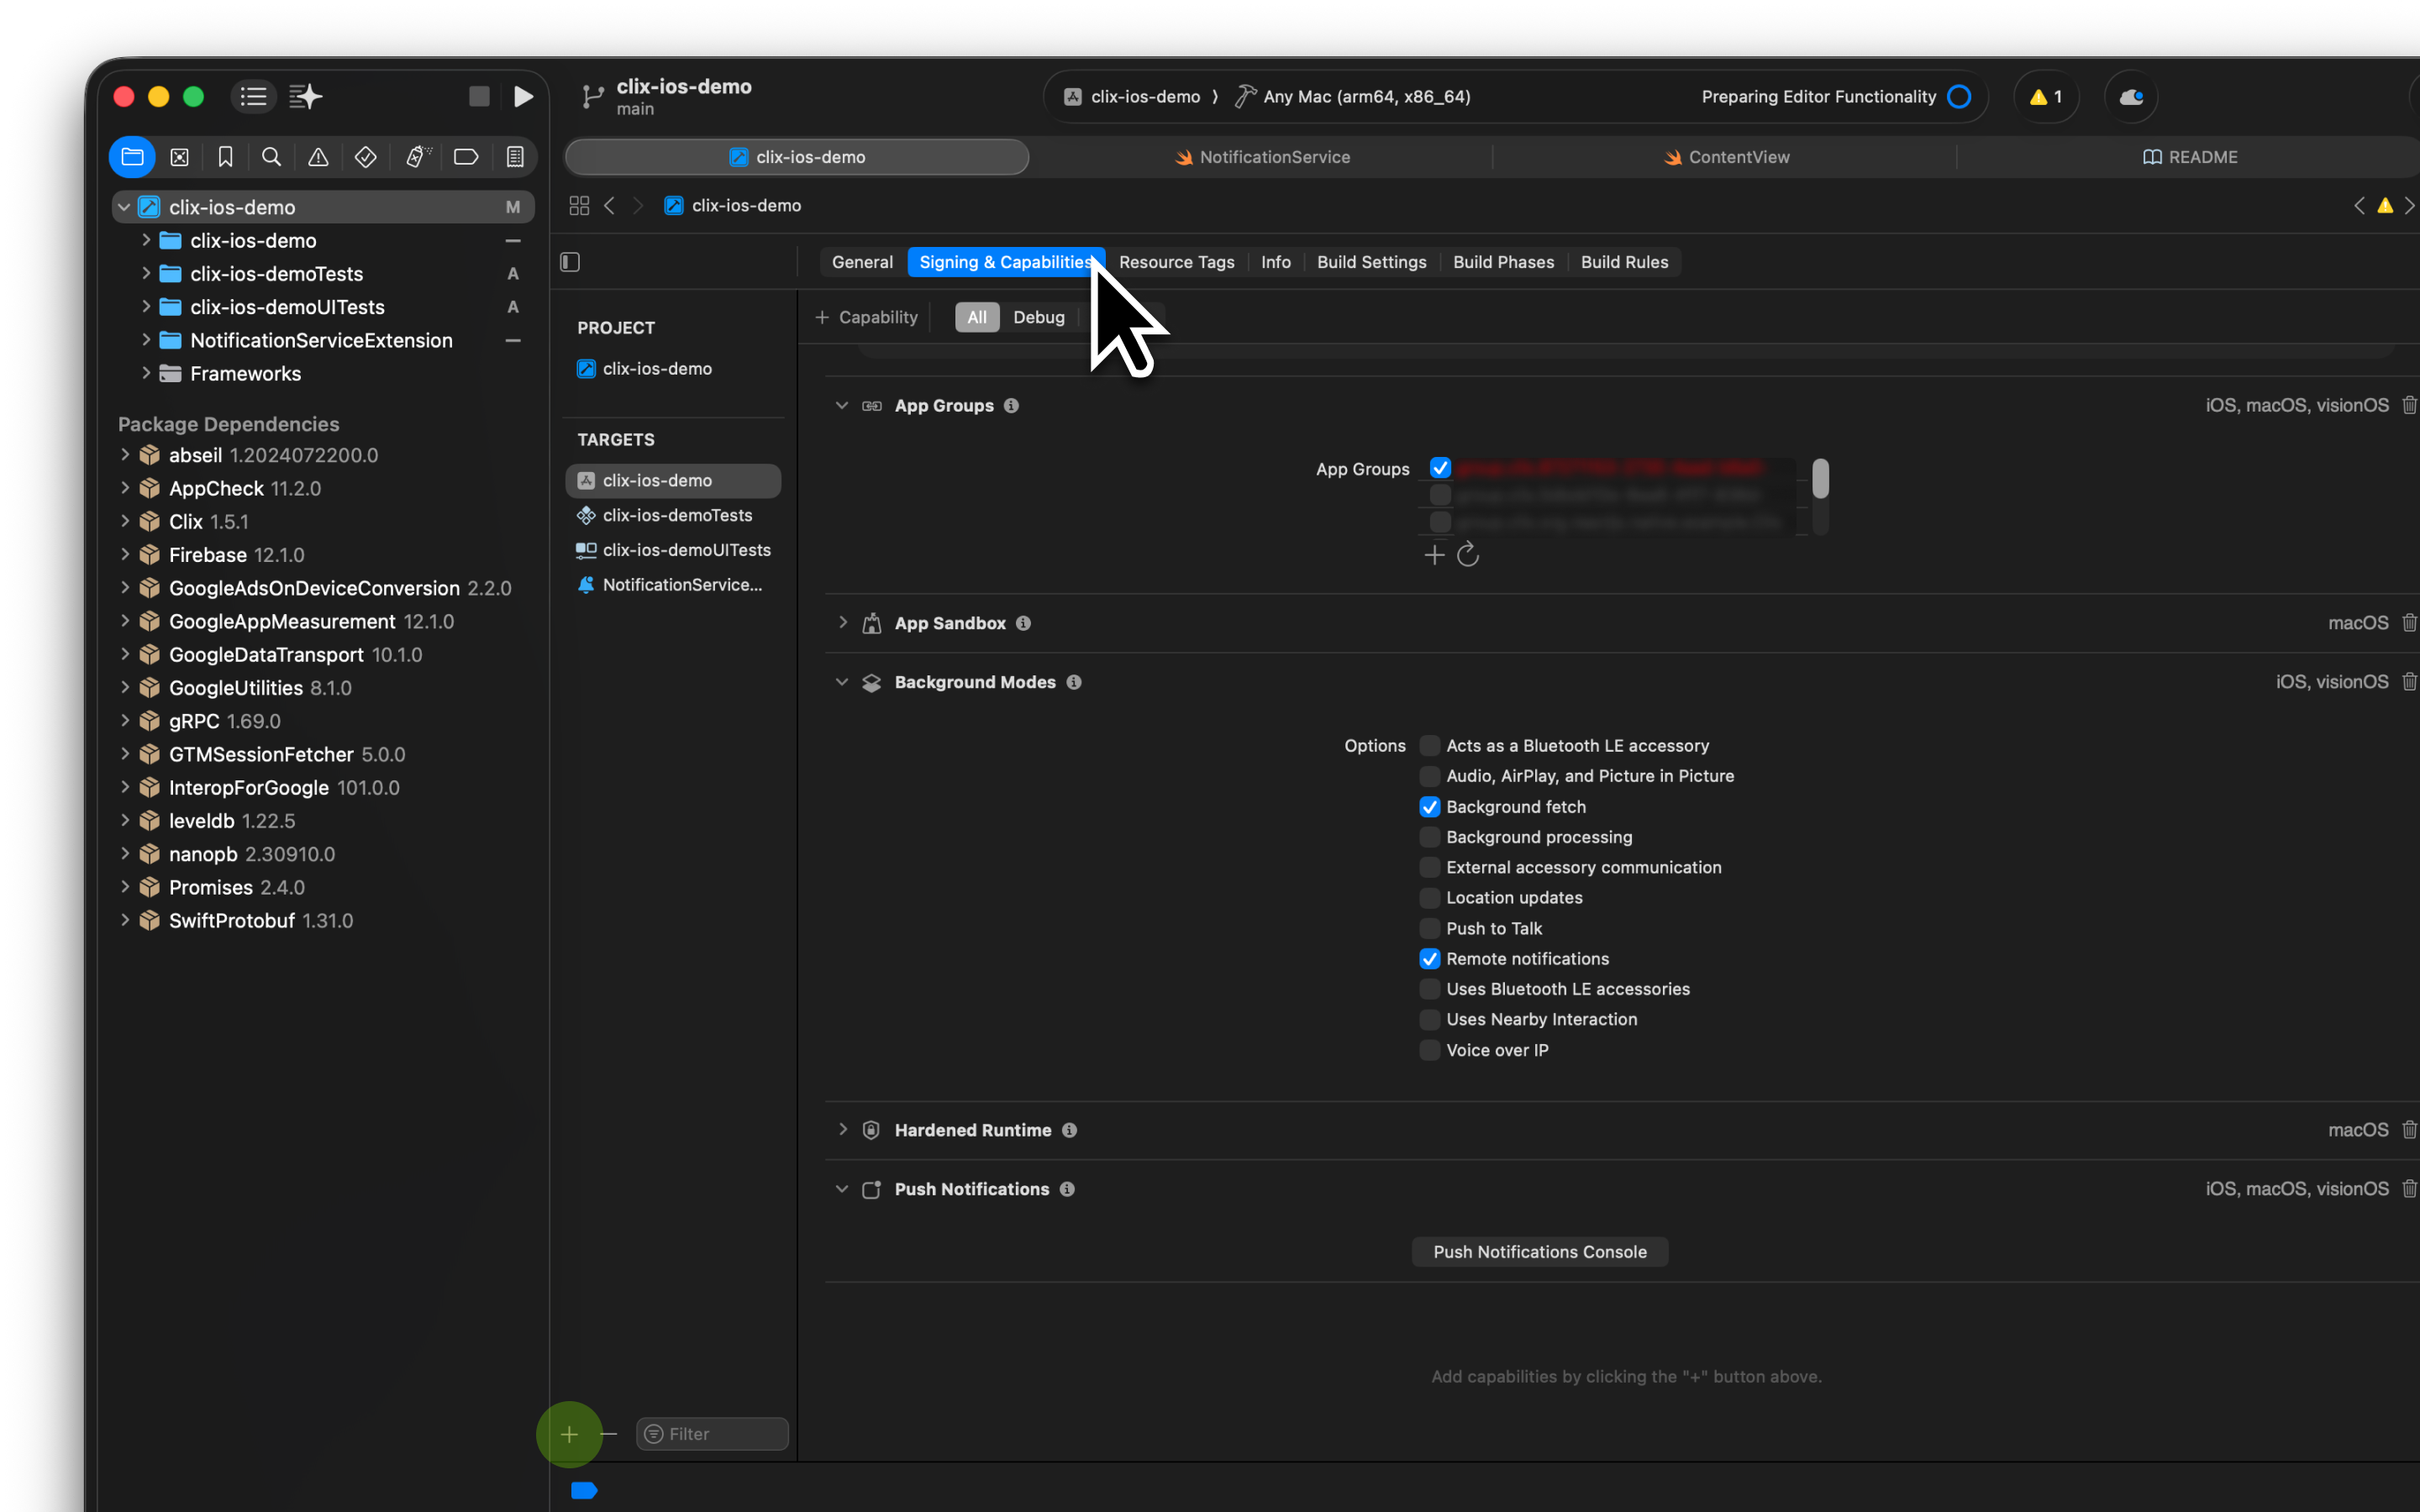 If you see "Push Notifications" in the Capabilities tab, you're all set!
Create a Notification Service Extension to handle image downloads and event tracking.
1. In Xcode, go to **File > New > Target**.
2. Select **Notification Service Extension** from the template list and click **Next**.
3. Enter a name for your extension (e.g., `ClixNotificationExtension`).
4. Click **Finish**.
5. When the "Activate scheme?" dialog appears, select **Cancel**.
If you see "Push Notifications" in the Capabilities tab, you're all set!
Create a Notification Service Extension to handle image downloads and event tracking.
1. In Xcode, go to **File > New > Target**.
2. Select **Notification Service Extension** from the template list and click **Next**.
3. Enter a name for your extension (e.g., `ClixNotificationExtension`).
4. Click **Finish**.
5. When the "Activate scheme?" dialog appears, select **Cancel**.
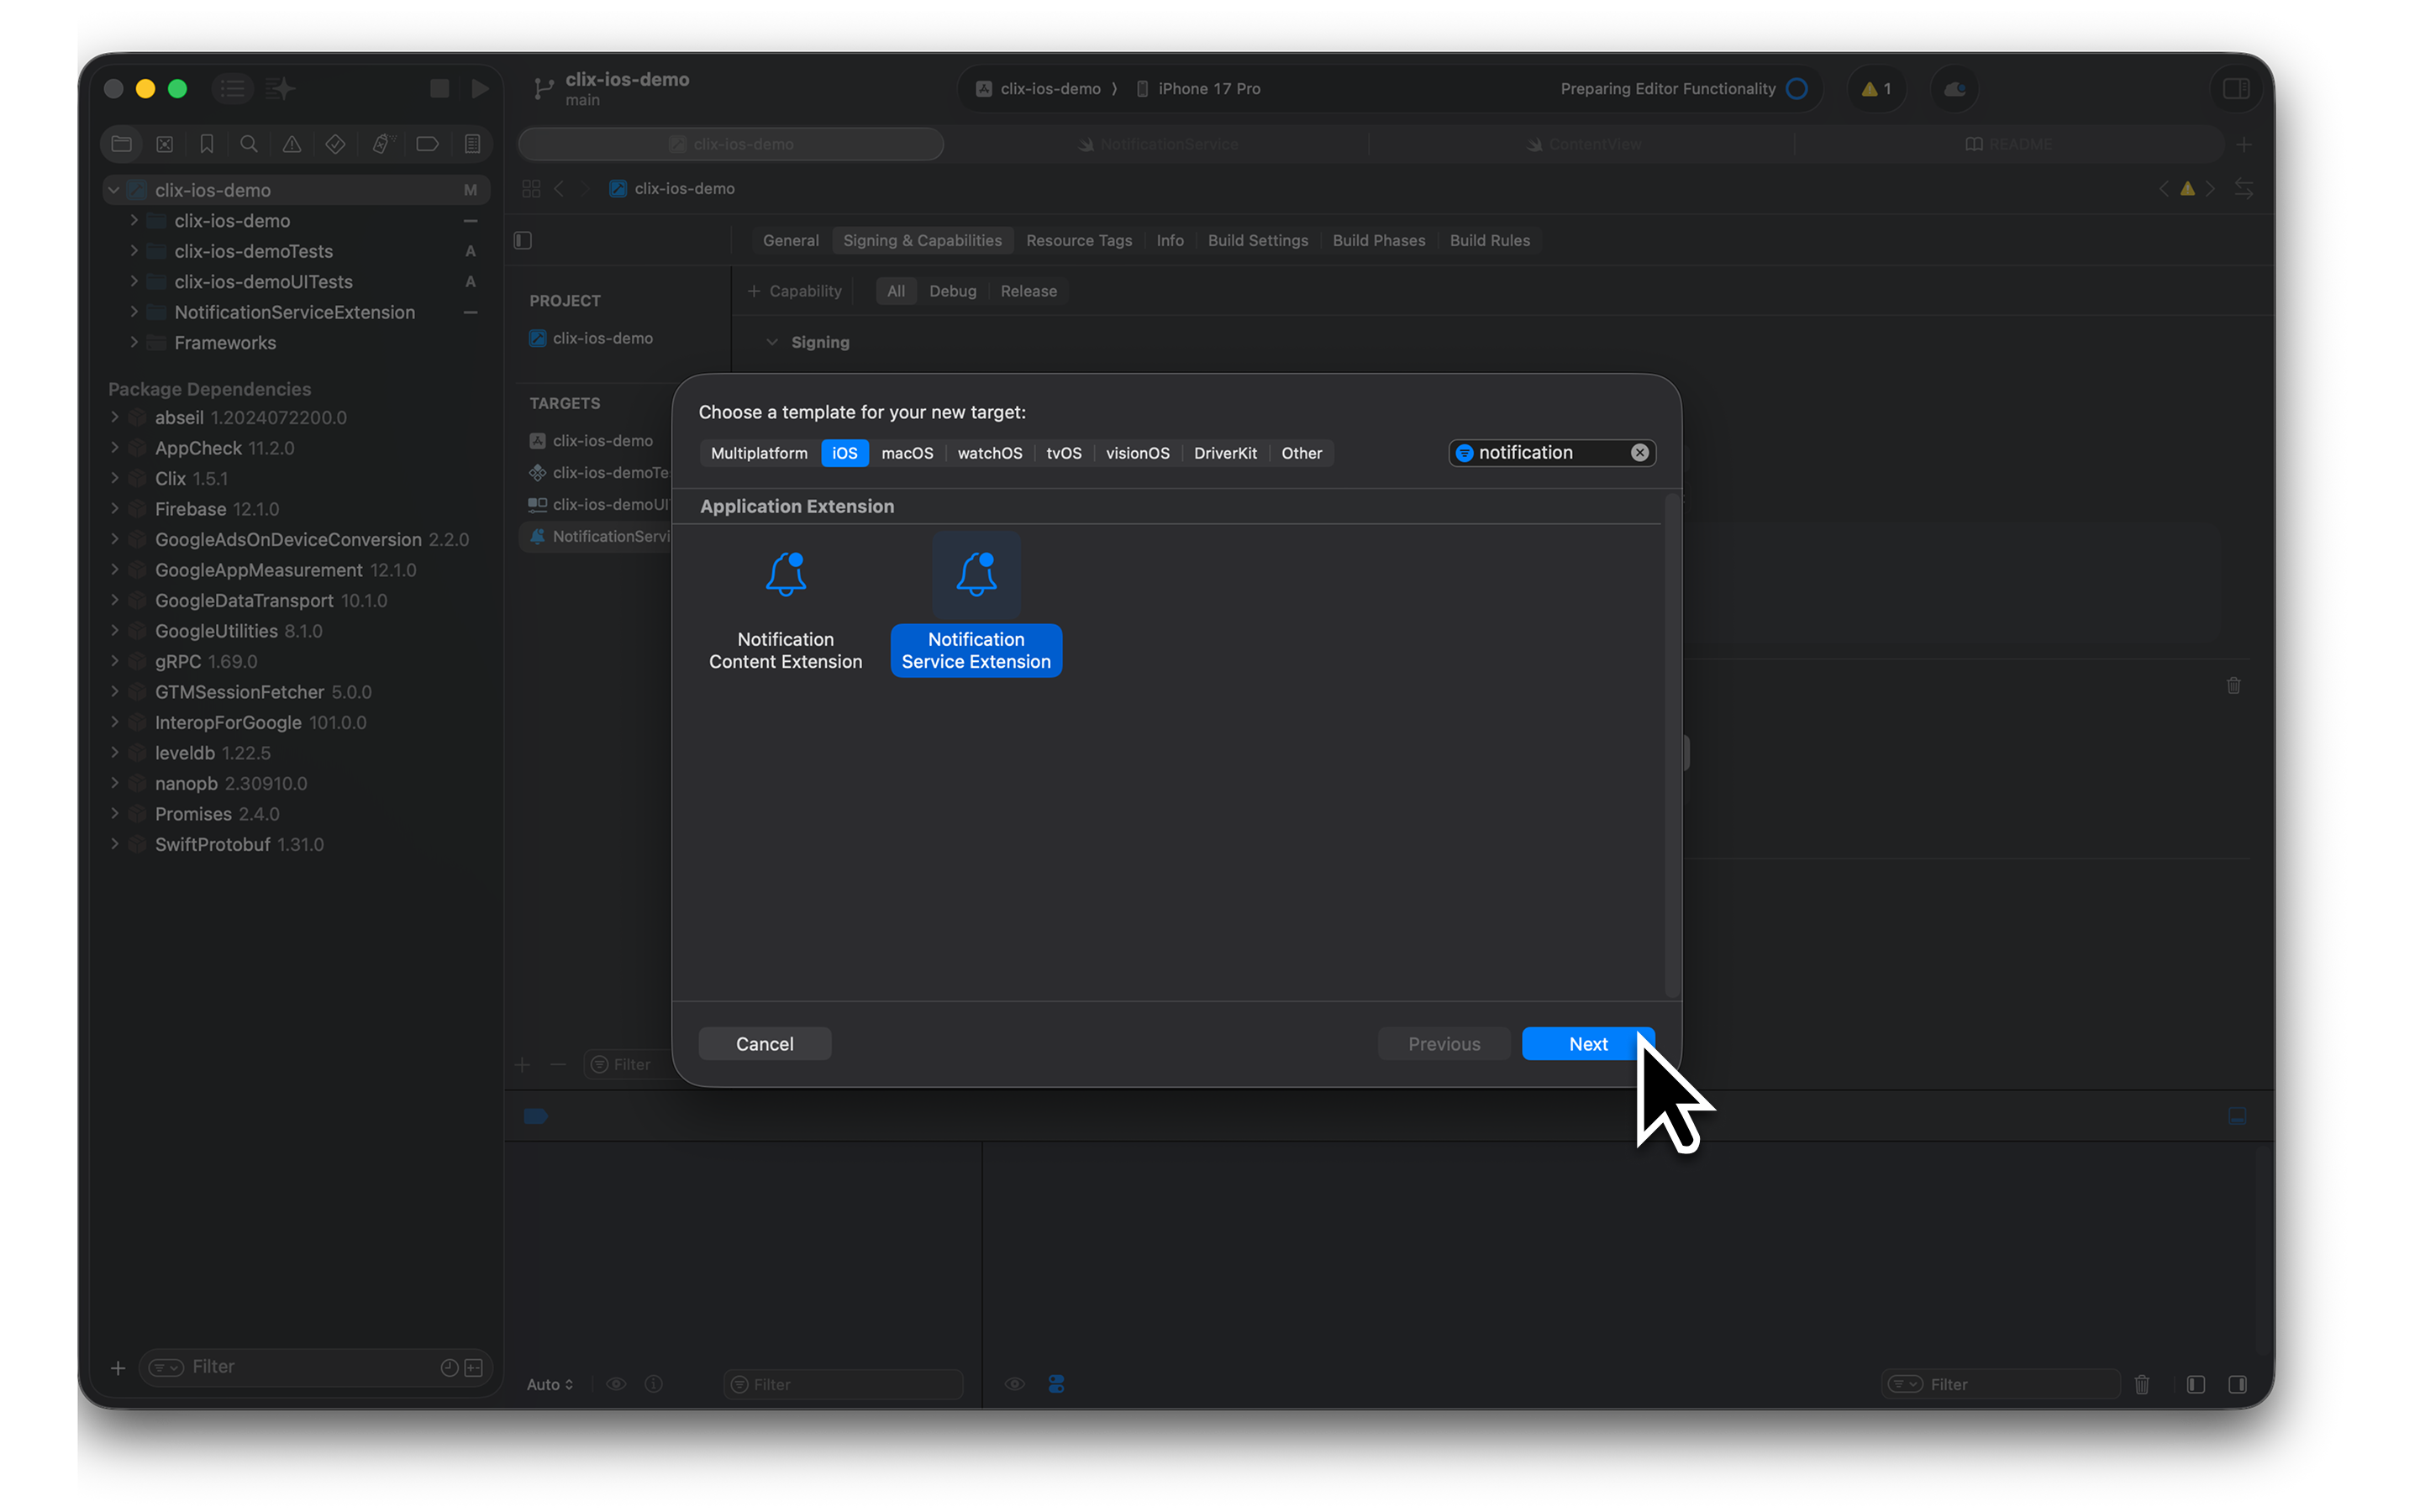 After creation, you'll see a new folder and a `NotificationService.swift` file added to your project.
Add the Clix SDK to your Notification Service Extension so it can use Clix functionality.
**For React Native users**: React Native projects do not support Swift Package Manager (SPM). You must use CocoaPods (Option 2).
### Option 1) Using Swift Package Manager (SPM)
1. Open your iOS project (`.xcodeproj` or `.xcworkspace`) in Xcode.
2. Go to **File > Add Package Dependencies** from the menu.
3. Enter the following URL in the search field:
```
https://github.com/clix-so/clix-ios-sdk.git
```
4. Click **Add Package** to add the package.
5. **Important**: Select only your **extension target** (e.g., ClixNotificationExtension) to install. Do NOT select the main app target.
***
### Option 2) Using CocoaPods
1. Open your `Podfile` in your iOS project root.
2. Add ClixSDK **only to the extension target**:
```ruby Podfile theme={null}
target 'YourMainApp' do
# Firebase and other main app dependencies...
# DO NOT add ClixSDK here
end
target 'ClixNotificationExtension' do
pod 'Clix'
end
```
3. Run the following command in your terminal:
If you encounter any build errors, please refer to the [Troubleshooting](#troubleshooting) section below for common issues and solutions. We recommend to go through all solutions before you build the project.
```bash theme={null}
cd ios
pod install
```
If you're using CocoaPods, make sure to open the `.xcworkspace` file for all subsequent steps.
Configure App Groups to enable data sharing between your main app and the extension.
### Add App Groups to Main App Target
1. Select your **main app target**.
2. Go to the **Signing & Capabilities** tab.
3. Click the **+ Capability** button.
4. Find and add **App Groups**.
5. Click the **+** button in the App Groups section.
6. Create an App Group ID using the following format:
**The App Group ID must follow this exact format:**
```
group.clix.YOUR_APP_BUNDLE_ID
```
Replace `YOUR_APP_BUNDLE_ID` with your actual Clix project ID, which can be found in the Clix Console **Settings** page.
### Add Same App Groups to Extension Target
1. Select your **extension target** (e.g., ClixNotificationExtension).
2. Navigate to the **Signing & Capabilities** tab.
3. Click **+ Capability** and add **App Groups**.
4. Check the same App Group ID that you created for the main app.
Both your main app and extension targets must share the same App Group ID.
Modify the `NotificationService.swift` file in your extension with the following code:
Replace `YOUR_APP_BUNDLE_ID` with your actual app identifier.
```swift NotificationService.swift theme={null}
import Clix
import UserNotifications
/// NotificationService inherits all logic from ClixNotificationServiceExtension
/// No additional logic is needed unless you want to customize notification handling.
class NotificationService: ClixNotificationServiceExtension {
// Initialize with your Clix project ID
override init() {
super.init()
// Register your Clix project ID
register(projectId: YOUR_PROJECT_ID)
}
override func didReceive(
_ request: UNNotificationRequest,
withContentHandler contentHandler: @escaping (UNNotificationContent) -> Void
) {
// Call super to handle image downloading and send push received event
super.didReceive(request, withContentHandler: contentHandler)
}
override func serviceExtensionTimeWillExpire() {
super.serviceExtensionTimeWillExpire()
}
}
```
`ClixNotificationServiceExtension` automatically handles:
* Downloading images from push notification payloads
* Sending push reception events to the Clix server
* Modifying and displaying notification content
Now that setup is complete, let's test your implementation.
### 1. Build Your Project
If you encounter any build errors, please refer to the [Troubleshooting](#troubleshooting) section below for common issues and solutions.
1. Select your main app scheme in Xcode.
2. Run **Product > Build** (⌘+B) to ensure there are no build errors.
3. Install the app on a real iOS device (simulators cannot receive push notifications).
### 2. Test Push Notifications
1. Launch the app and grant push notification permissions.
2. Navigate to the **Test Console** page in the Clix Console.
3. Find and select your registered device.
4. Send a test push message with an image.
5. Verify that the notification with the image is received on your device.
### 3. Verify Event Tracking
1. Open the real-time events panel in the Clix Console.
2. Check that "Push Received" events are being recorded in real-time when you receive push notifications.
If you see rich push notifications with images and push reception events are logged in the console, your installation is complete!
## Troubleshooting
When you add a Notification Service Extension (regardless of Clix installation), you may encounter build conflicts with RN-Firebase.
**Error symptom:**
* Build fails during the Embed Foundation Extensions phase
* Conflicts with \[RNFB] Core Configuration
**Solution:**
1. In Xcode, select your main app target.
2. Go to the **Build Phases** tab.
3. Find the **Embed Foundation Extensions** phase.
4. Drag it **above** the **\[RNFB] Core Configuration** phase.
This ensures that the extension is embedded before RN-Firebase's configuration runs.
**Reference:** [OneSignal Issue #1569](https://github.com/OneSignal/react-native-onesignal/issues/1569)
When you add a Notification Service Extension, Xcode automatically modifies the `project.pbxproj` file. If the `objectVersion` changes, you may encounter errors during `pod install` depending on your CocoaPods version and Xcode version.
**Error symptom:**
* `pod install` fails with version-related errors
* Error messages about incompatible project format
**Solution:**
1. Open your project in Xcode.
2. Select the project (root level) in the project navigator.
3. In the **File Inspector** (right panel), find **Project Format**.
4. Change the Xcode version to match your current Xcode installation.
5. Save and run `pod install` again.
**Reference:** [CocoaPods Issue #12840](https://github.com/CocoaPods/CocoaPods/issues/12840)
After installing Clix, you may see an error during the **\[CP] Embed Pods Frameworks** build phase. This occurs because CocoaPods tries to copy dependencies to the NSE target but lacks file write permissions.
**Error symptom:**
* Build fails at \[CP] Embed Pods Frameworks phase
* Permission denied errors when copying frameworks to the extension
**Root cause:**
In Xcode 15 and later, when you create a Notification Service Extension, the `ENABLE_USER_SCRIPT_SANDBOXING` build setting defaults to `YES`, which restricts script permissions.
**Solution:**
1. Select your **NSE target** (e.g., ClixNotificationExtension) in Xcode.
2. Go to **Build Settings**.
3. Search for `ENABLE_USER_SCRIPT_SANDBOXING`.
4. Set it to **No**.
5. Clean and rebuild your project.
**Reference:** [CocoaPods Issue #11946](https://github.com/CocoaPods/CocoaPods/issues/11946)
{" "}
* Verify that the Clix SDK is properly added to the extension target. - Check
that the App Group ID is identical in both the main app and extension targets.
* Ensure that you're calling `super.didReceive` in
`NotificationService.swift`. - Verify that the push payload contains a valid
image URL.
{" "}
* Verify that you've entered the correct project ID in the
`register(projectId:)` method. - Check that the device is connected to the
internet. - Review the Xcode console for any error logs.
* Try restarting Xcode and running Clean Build Folder (⌘+Shift+K).
* If using CocoaPods, run `pod install` again.
* If using Swift Package Manager, go to **File > Packages > Reset Package Caches**.
## Additional Resources
If you need to set up Firebase initially, refer to this guide.
Check out the SDK source code and sample projects.
Complete setup guide for React Native projects.
Complete setup guide for Flutter projects.
After creation, you'll see a new folder and a `NotificationService.swift` file added to your project.
Add the Clix SDK to your Notification Service Extension so it can use Clix functionality.
**For React Native users**: React Native projects do not support Swift Package Manager (SPM). You must use CocoaPods (Option 2).
### Option 1) Using Swift Package Manager (SPM)
1. Open your iOS project (`.xcodeproj` or `.xcworkspace`) in Xcode.
2. Go to **File > Add Package Dependencies** from the menu.
3. Enter the following URL in the search field:
```
https://github.com/clix-so/clix-ios-sdk.git
```
4. Click **Add Package** to add the package.
5. **Important**: Select only your **extension target** (e.g., ClixNotificationExtension) to install. Do NOT select the main app target.
***
### Option 2) Using CocoaPods
1. Open your `Podfile` in your iOS project root.
2. Add ClixSDK **only to the extension target**:
```ruby Podfile theme={null}
target 'YourMainApp' do
# Firebase and other main app dependencies...
# DO NOT add ClixSDK here
end
target 'ClixNotificationExtension' do
pod 'Clix'
end
```
3. Run the following command in your terminal:
If you encounter any build errors, please refer to the [Troubleshooting](#troubleshooting) section below for common issues and solutions. We recommend to go through all solutions before you build the project.
```bash theme={null}
cd ios
pod install
```
If you're using CocoaPods, make sure to open the `.xcworkspace` file for all subsequent steps.
Configure App Groups to enable data sharing between your main app and the extension.
### Add App Groups to Main App Target
1. Select your **main app target**.
2. Go to the **Signing & Capabilities** tab.
3. Click the **+ Capability** button.
4. Find and add **App Groups**.
5. Click the **+** button in the App Groups section.
6. Create an App Group ID using the following format:
**The App Group ID must follow this exact format:**
```
group.clix.YOUR_APP_BUNDLE_ID
```
Replace `YOUR_APP_BUNDLE_ID` with your actual Clix project ID, which can be found in the Clix Console **Settings** page.
### Add Same App Groups to Extension Target
1. Select your **extension target** (e.g., ClixNotificationExtension).
2. Navigate to the **Signing & Capabilities** tab.
3. Click **+ Capability** and add **App Groups**.
4. Check the same App Group ID that you created for the main app.
Both your main app and extension targets must share the same App Group ID.
Modify the `NotificationService.swift` file in your extension with the following code:
Replace `YOUR_APP_BUNDLE_ID` with your actual app identifier.
```swift NotificationService.swift theme={null}
import Clix
import UserNotifications
/// NotificationService inherits all logic from ClixNotificationServiceExtension
/// No additional logic is needed unless you want to customize notification handling.
class NotificationService: ClixNotificationServiceExtension {
// Initialize with your Clix project ID
override init() {
super.init()
// Register your Clix project ID
register(projectId: YOUR_PROJECT_ID)
}
override func didReceive(
_ request: UNNotificationRequest,
withContentHandler contentHandler: @escaping (UNNotificationContent) -> Void
) {
// Call super to handle image downloading and send push received event
super.didReceive(request, withContentHandler: contentHandler)
}
override func serviceExtensionTimeWillExpire() {
super.serviceExtensionTimeWillExpire()
}
}
```
`ClixNotificationServiceExtension` automatically handles:
* Downloading images from push notification payloads
* Sending push reception events to the Clix server
* Modifying and displaying notification content
Now that setup is complete, let's test your implementation.
### 1. Build Your Project
If you encounter any build errors, please refer to the [Troubleshooting](#troubleshooting) section below for common issues and solutions.
1. Select your main app scheme in Xcode.
2. Run **Product > Build** (⌘+B) to ensure there are no build errors.
3. Install the app on a real iOS device (simulators cannot receive push notifications).
### 2. Test Push Notifications
1. Launch the app and grant push notification permissions.
2. Navigate to the **Test Console** page in the Clix Console.
3. Find and select your registered device.
4. Send a test push message with an image.
5. Verify that the notification with the image is received on your device.
### 3. Verify Event Tracking
1. Open the real-time events panel in the Clix Console.
2. Check that "Push Received" events are being recorded in real-time when you receive push notifications.
If you see rich push notifications with images and push reception events are logged in the console, your installation is complete!
## Troubleshooting
When you add a Notification Service Extension (regardless of Clix installation), you may encounter build conflicts with RN-Firebase.
**Error symptom:**
* Build fails during the Embed Foundation Extensions phase
* Conflicts with \[RNFB] Core Configuration
**Solution:**
1. In Xcode, select your main app target.
2. Go to the **Build Phases** tab.
3. Find the **Embed Foundation Extensions** phase.
4. Drag it **above** the **\[RNFB] Core Configuration** phase.
This ensures that the extension is embedded before RN-Firebase's configuration runs.
**Reference:** [OneSignal Issue #1569](https://github.com/OneSignal/react-native-onesignal/issues/1569)
When you add a Notification Service Extension, Xcode automatically modifies the `project.pbxproj` file. If the `objectVersion` changes, you may encounter errors during `pod install` depending on your CocoaPods version and Xcode version.
**Error symptom:**
* `pod install` fails with version-related errors
* Error messages about incompatible project format
**Solution:**
1. Open your project in Xcode.
2. Select the project (root level) in the project navigator.
3. In the **File Inspector** (right panel), find **Project Format**.
4. Change the Xcode version to match your current Xcode installation.
5. Save and run `pod install` again.
**Reference:** [CocoaPods Issue #12840](https://github.com/CocoaPods/CocoaPods/issues/12840)
After installing Clix, you may see an error during the **\[CP] Embed Pods Frameworks** build phase. This occurs because CocoaPods tries to copy dependencies to the NSE target but lacks file write permissions.
**Error symptom:**
* Build fails at \[CP] Embed Pods Frameworks phase
* Permission denied errors when copying frameworks to the extension
**Root cause:**
In Xcode 15 and later, when you create a Notification Service Extension, the `ENABLE_USER_SCRIPT_SANDBOXING` build setting defaults to `YES`, which restricts script permissions.
**Solution:**
1. Select your **NSE target** (e.g., ClixNotificationExtension) in Xcode.
2. Go to **Build Settings**.
3. Search for `ENABLE_USER_SCRIPT_SANDBOXING`.
4. Set it to **No**.
5. Clean and rebuild your project.
**Reference:** [CocoaPods Issue #11946](https://github.com/CocoaPods/CocoaPods/issues/11946)
{" "}
* Verify that the Clix SDK is properly added to the extension target. - Check
that the App Group ID is identical in both the main app and extension targets.
* Ensure that you're calling `super.didReceive` in
`NotificationService.swift`. - Verify that the push payload contains a valid
image URL.
{" "}
* Verify that you've entered the correct project ID in the
`register(projectId:)` method. - Check that the device is connected to the
internet. - Review the Xcode console for any error logs.
* Try restarting Xcode and running Clean Build Folder (⌘+Shift+K).
* If using CocoaPods, run `pod install` again.
* If using Swift Package Manager, go to **File > Packages > Reset Package Caches**.
## Additional Resources
If you need to set up Firebase initially, refer to this guide.
Check out the SDK source code and sample projects.
Complete setup guide for React Native projects.
Complete setup guide for Flutter projects.