> ## Documentation Index
> Fetch the complete documentation index at: https://docs.clix.so/llms.txt
> Use this file to discover all available pages before exploring further.
# Webhook
> Receive real-time push notification events and message payloads in your external systems.
## Overview
Webhooks allow you to receive real-time notifications when push notification events occur in Clix. Instead of repeatedly polling for updates, Clix will automatically send HTTP POST requests to your specified endpoint whenever a push notification is sent or fails.
This integration enables you to:
* Track delivery status of push notifications in real-time
* Sync notification data with your internal systems
* Build custom analytics and monitoring dashboards
* Trigger automated workflows based on notification events
High volumes of push notifications can generate significant traffic to your
webhook endpoint. We strongly recommend conducting TPS (Transactions Per
Second) and stress tests on your server infrastructure to ensure it can handle
the expected load before enabling webhooks in production.
## Prerequisites
Before setting up webhooks, ensure you have:
* An accessible HTTPS endpoint that can receive POST requests
* Proper authentication/authorization configured on your endpoint (if needed)
* A Clix project with appropriate permissions
Webhook endpoints must be publicly accessible. If your endpoint is behind a
firewall, you'll need to whitelist Clix's IP addresses.
## Setting Up a Webhook
### Step 1: Navigate to Webhook Settings
Go to your project settings and select the **Webhook** tab.
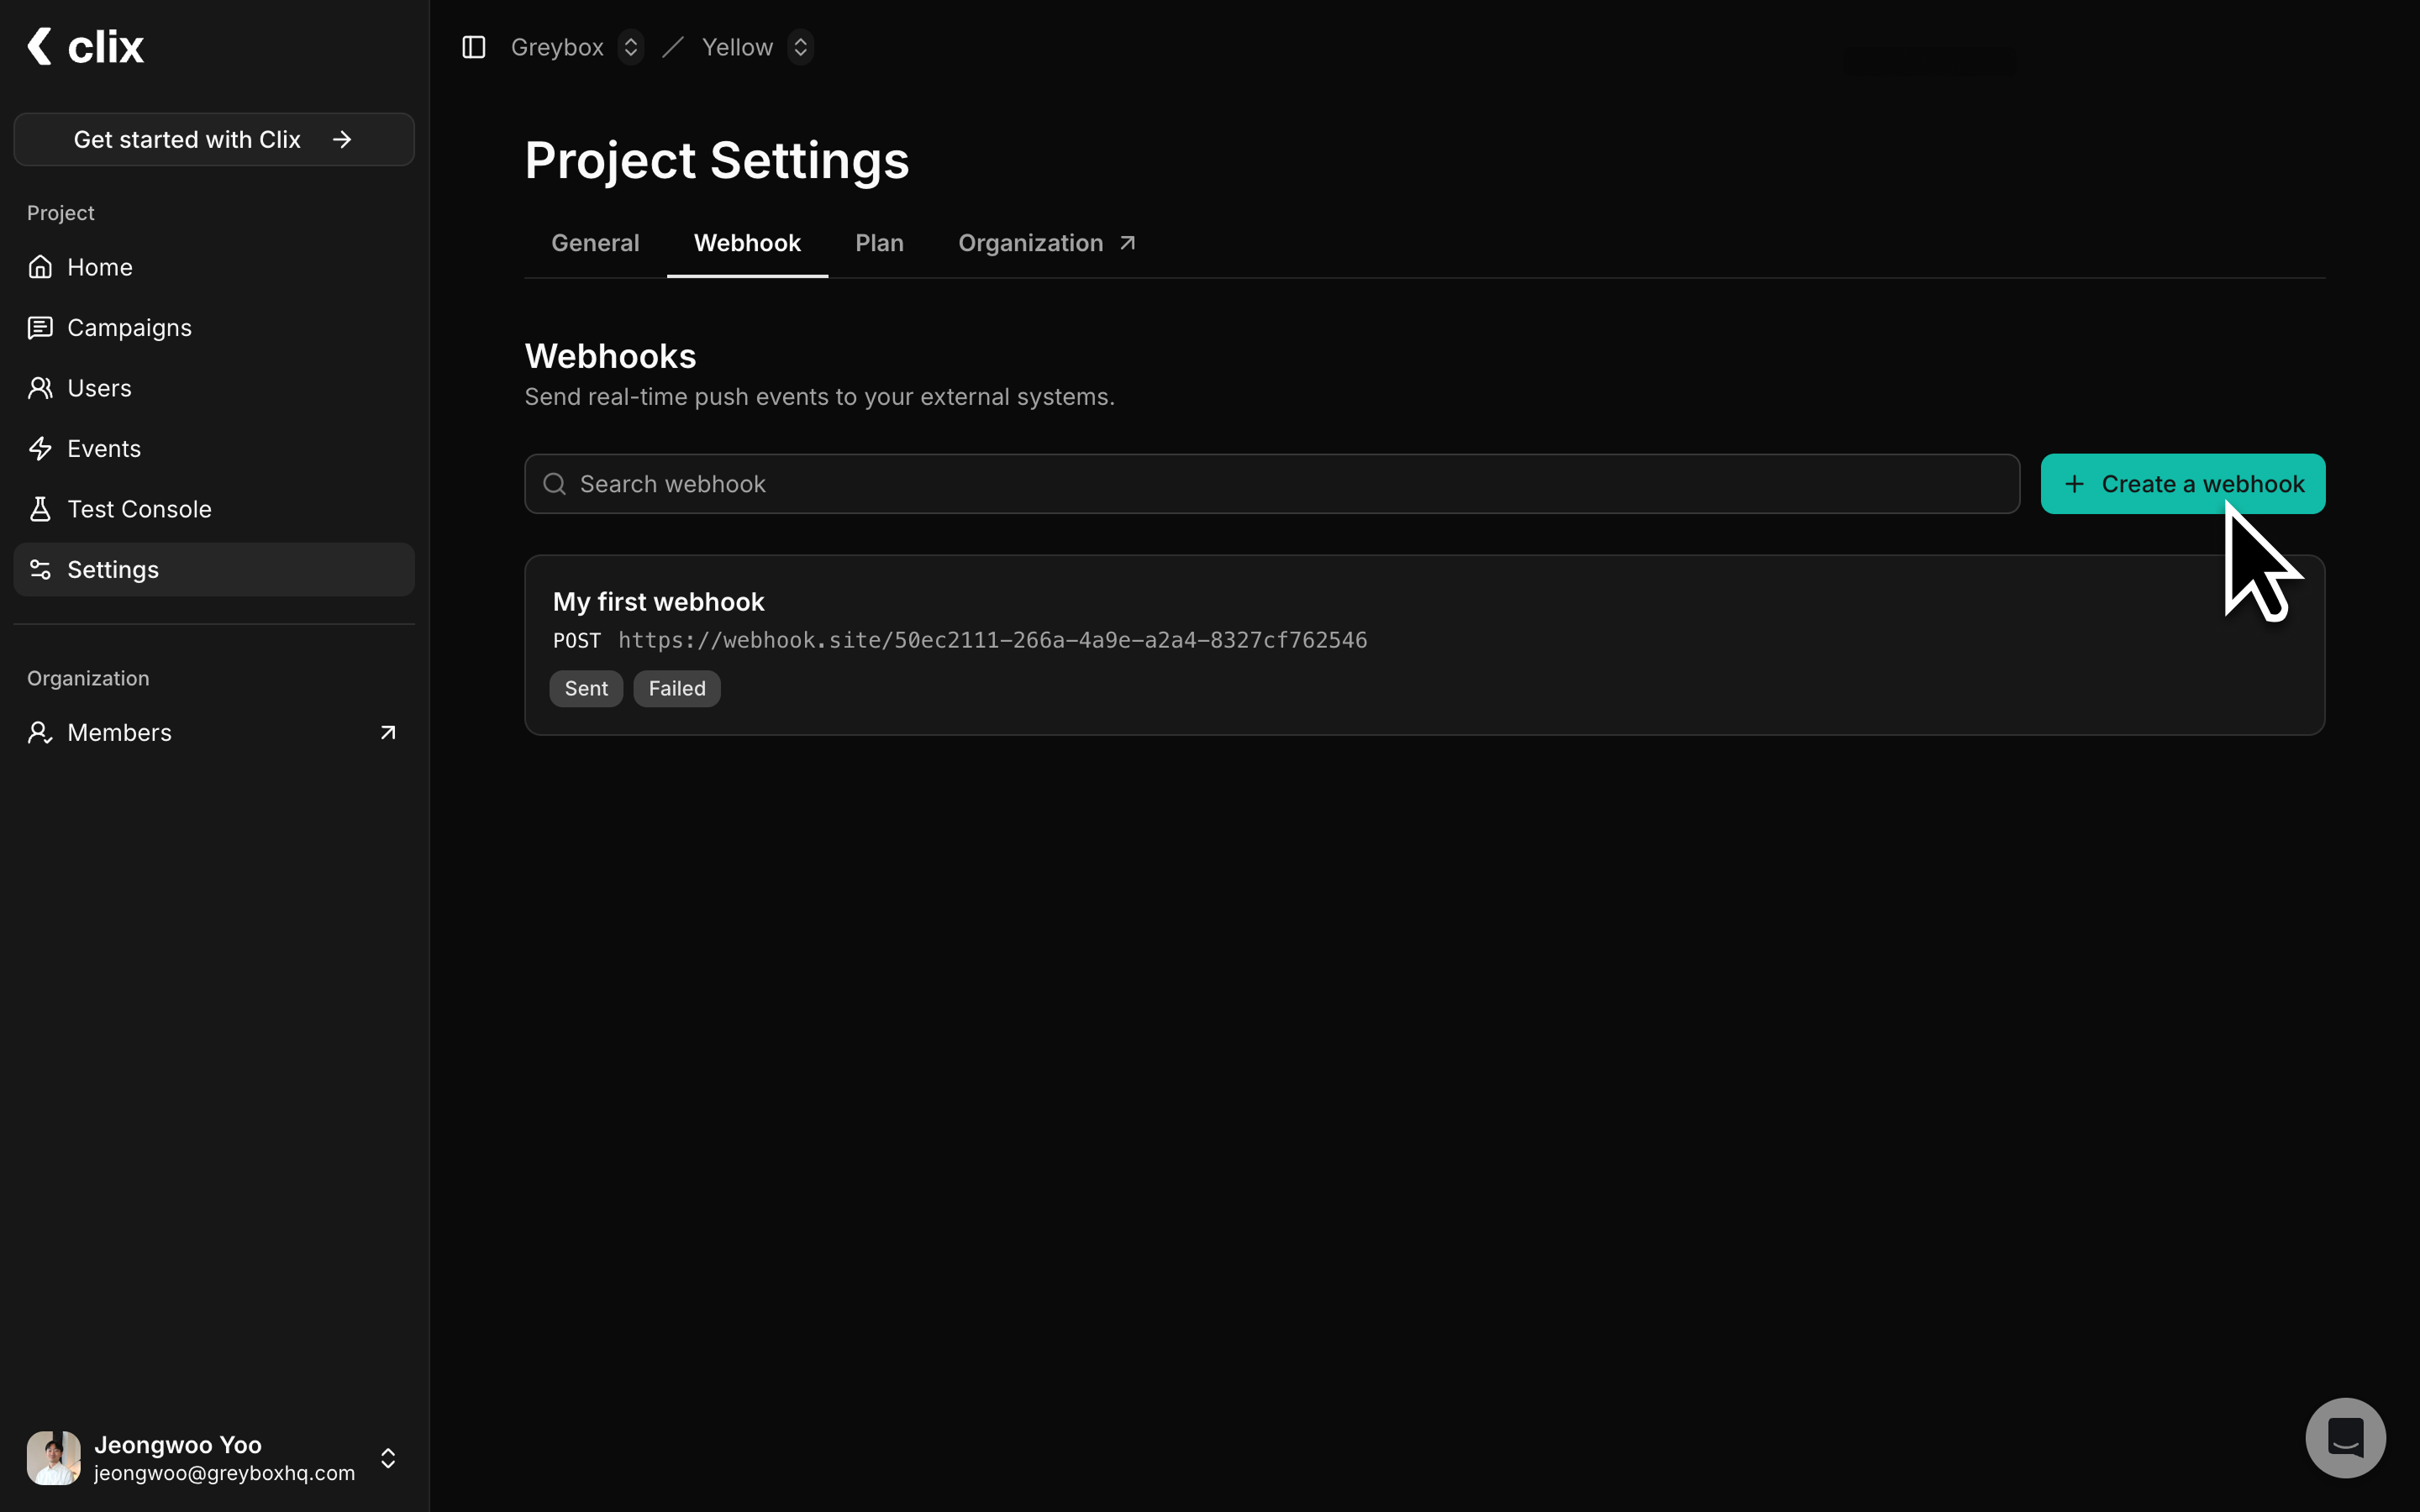 The webhook management page shows all configured webhooks for your project, including their URLs and event status indicators (Sent/Failed).
### Step 2: Create a New Webhook
Click the **"Create a webhook"** button to open the webhook configuration dialog.
The webhook management page shows all configured webhooks for your project, including their URLs and event status indicators (Sent/Failed).
### Step 2: Create a New Webhook
Click the **"Create a webhook"** button to open the webhook configuration dialog.
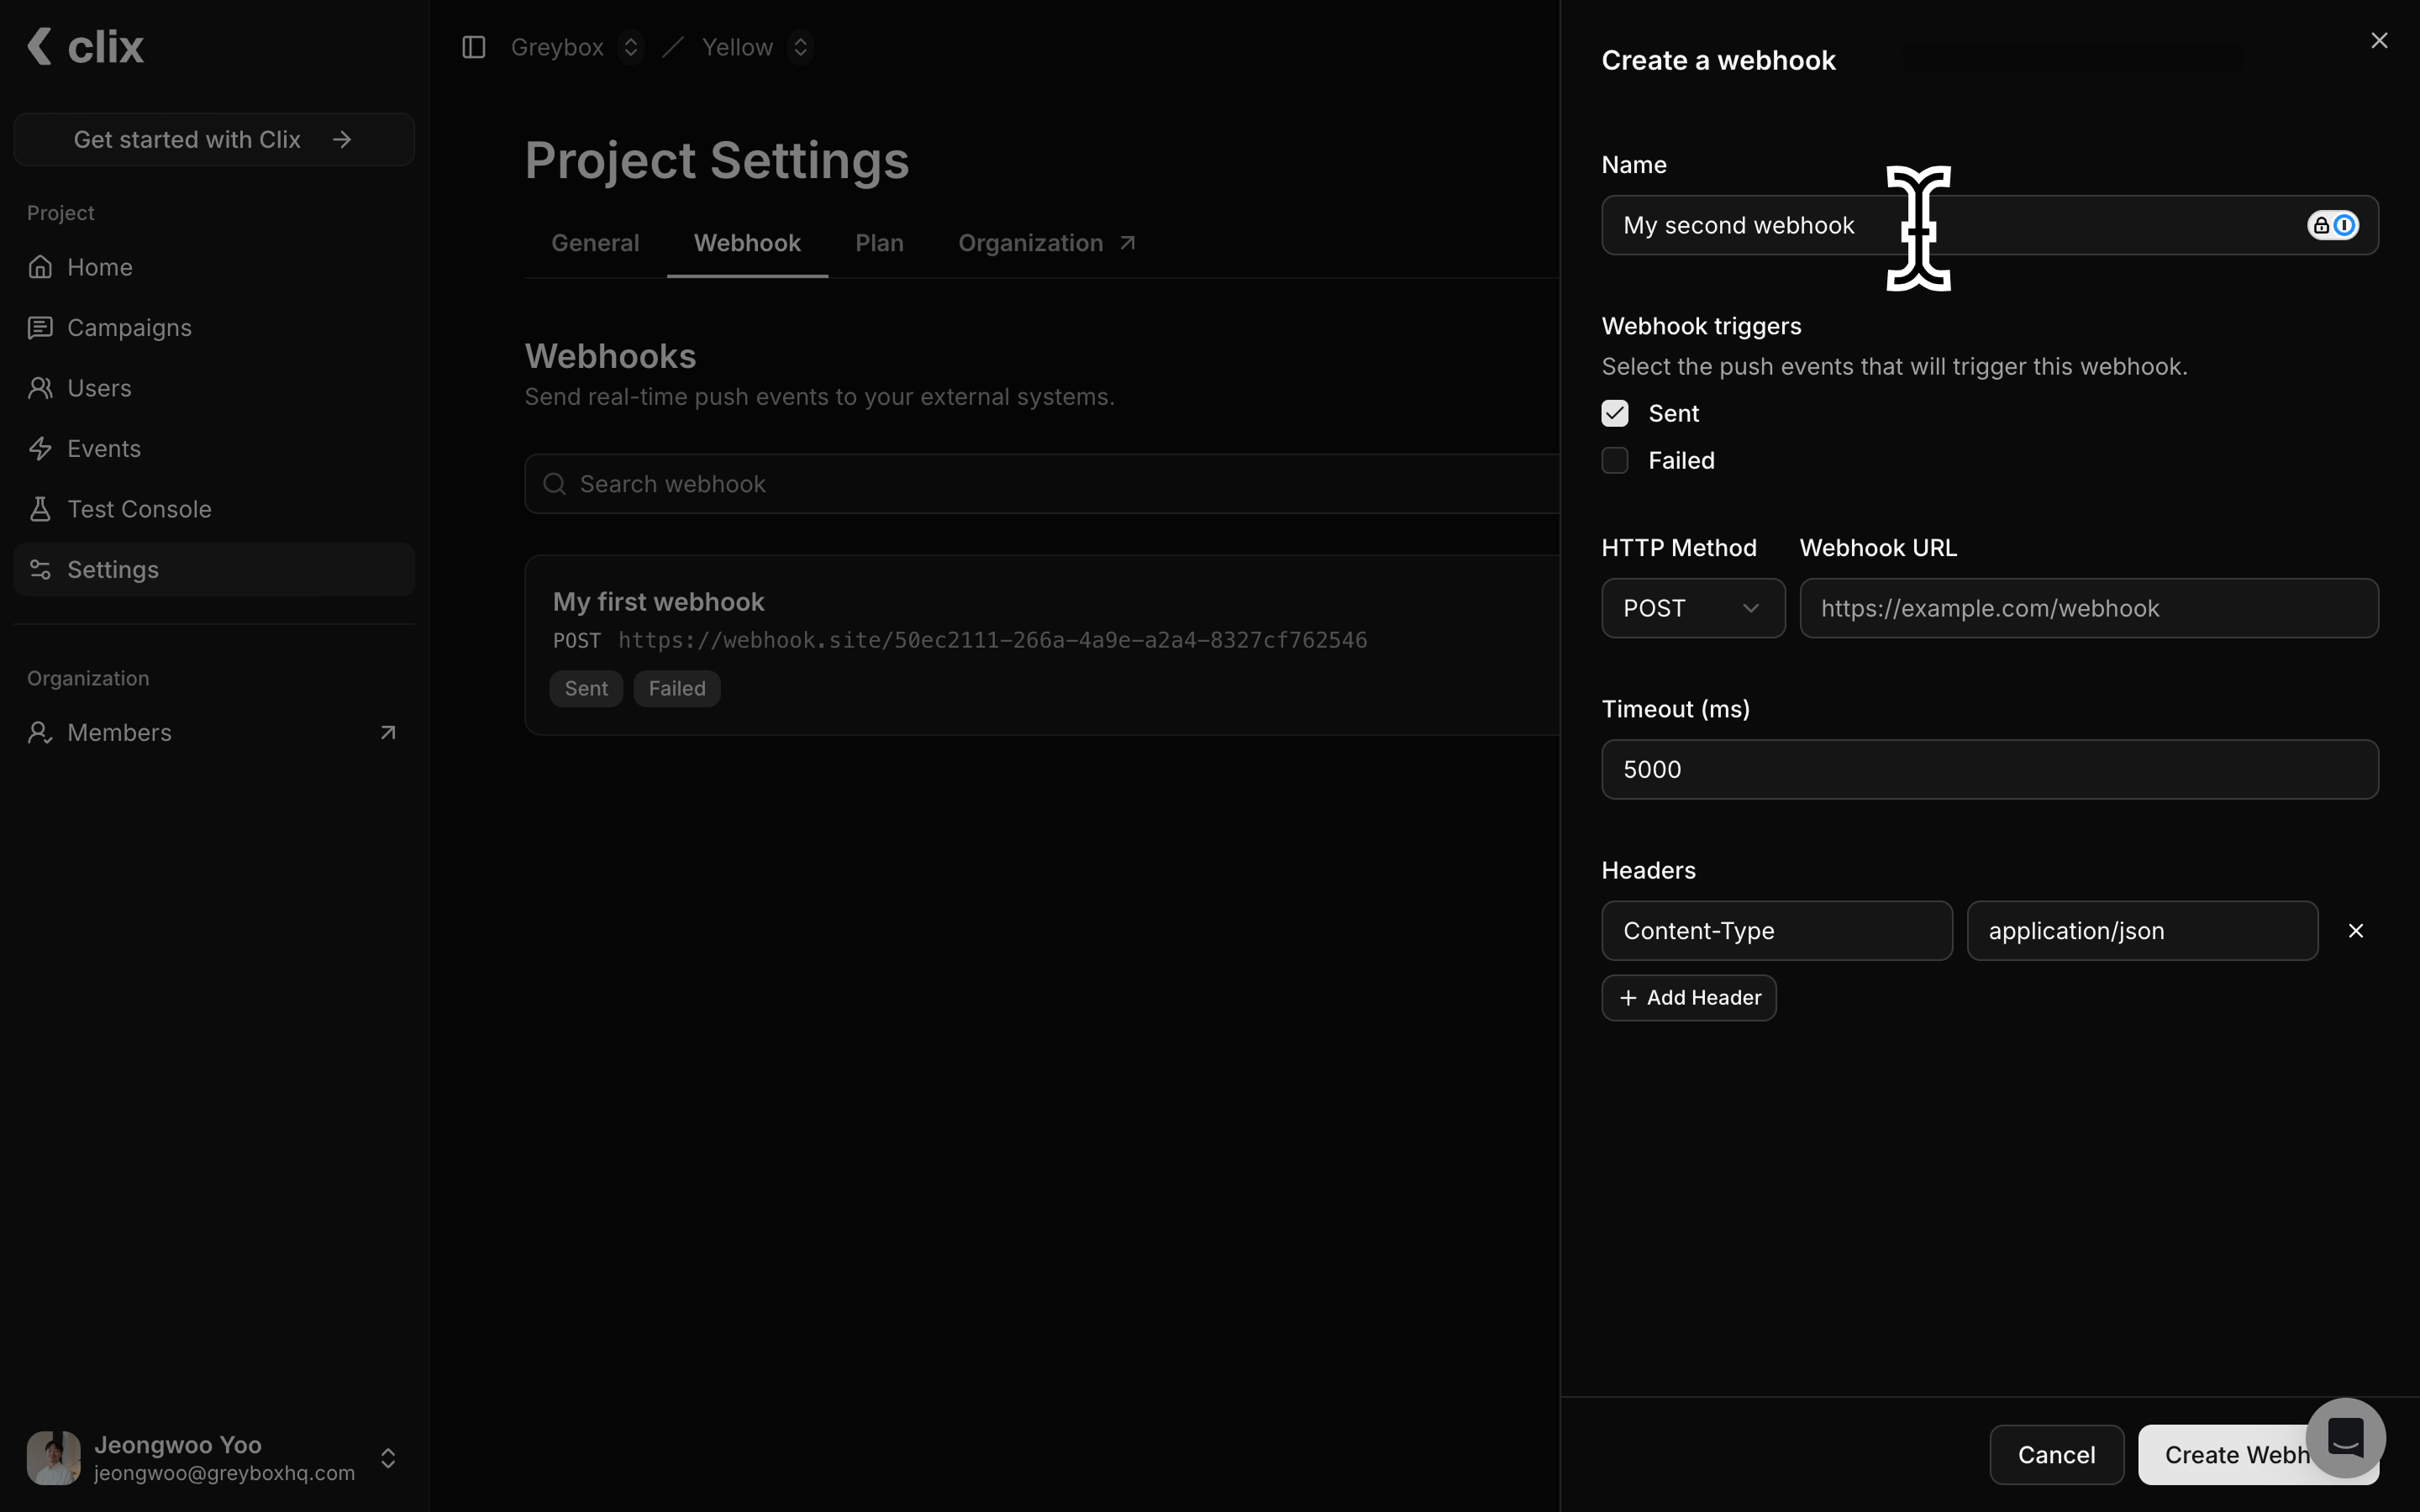 Fill in the following fields:
Enter a descriptive name to identify this webhook (e.g., "Production Analytics Webhook").
Select which push notification events should trigger this webhook:
* **Sent**: Triggered when a push notification is successfully delivered to the device
* **Failed**: Triggered when a push notification fails to be delivered
You can select one or both events based on your needs.
Configure the HTTP request details:
* **HTTP Method**: Currently supports POST
* **Webhook URL**: Enter your endpoint URL (must be a valid HTTPS URL)
* **Timeout (ms)**: Set the maximum time (in milliseconds) to wait for a response from your endpoint. Default is 5000ms (5 seconds).
Add custom HTTP headers if your endpoint requires authentication or specific content types:
* Click **"+ Add Header"** to add a new header
* Common headers include:
* `Content-Type`: `application/json` (automatically included)
* `Authorization`: For API key or bearer token authentication
* Custom headers for your application logic
### Step 3: Save and Activate
Click **"Create Webhook"** to save your configuration. The webhook will immediately start receiving events based on your selected triggers.
## Webhook Events
### Event Types
#### Sent Event
Triggered when a push notification is successfully sent to a device.
**Payload Example:**
```json theme={null}
{
"project_id": "YOUR_PROJECT_ID",
"event_type": "PUSH_SENT",
"timestamp": "2025-12-16T07:42:54.168140781Z",
"message_id": "abcdefgh-b3f9-7950-9b24-abcdefgh",
"device_id": "abcdefgh-9171-4292-8382-abcdefgh",
"platform": "ANDROID",
"notification": {
"title": "👋 Hello from Clix!",
"body": "This is a test message to check your push setup 🚀",
"image_url": "",
"landing_url": ""
}
}
```
#### Failed Event
Triggered when a push notification fails to be delivered.
**Payload Example:**
```json theme={null}
{
"project_id": "YOUR_PROJECT_ID",
"event_type": "PUSH_FAILED",
"timestamp": "2025-12-16T07:44:49.325936806Z",
"message_id": "abcdefgh-759f-7291-8968-abcdefgh",
"device_id": "abcdefgh-62bc-4ddf-9adc-abcdefgh",
"platform": "ANDROID",
"notification": {
"title": "👋 Hello from Clix!",
"body": "This is a test message to check your push setup 🚀",
"image_url": "",
"landing_url": ""
}
}
```
### Response Requirements
Your endpoint should:
* Respond with a `2xx` status code (200-299) to acknowledge receipt
* Respond within the configured timeout period
* Return a response as quickly as possible (ideally under 1 second)
## Test Webhooks
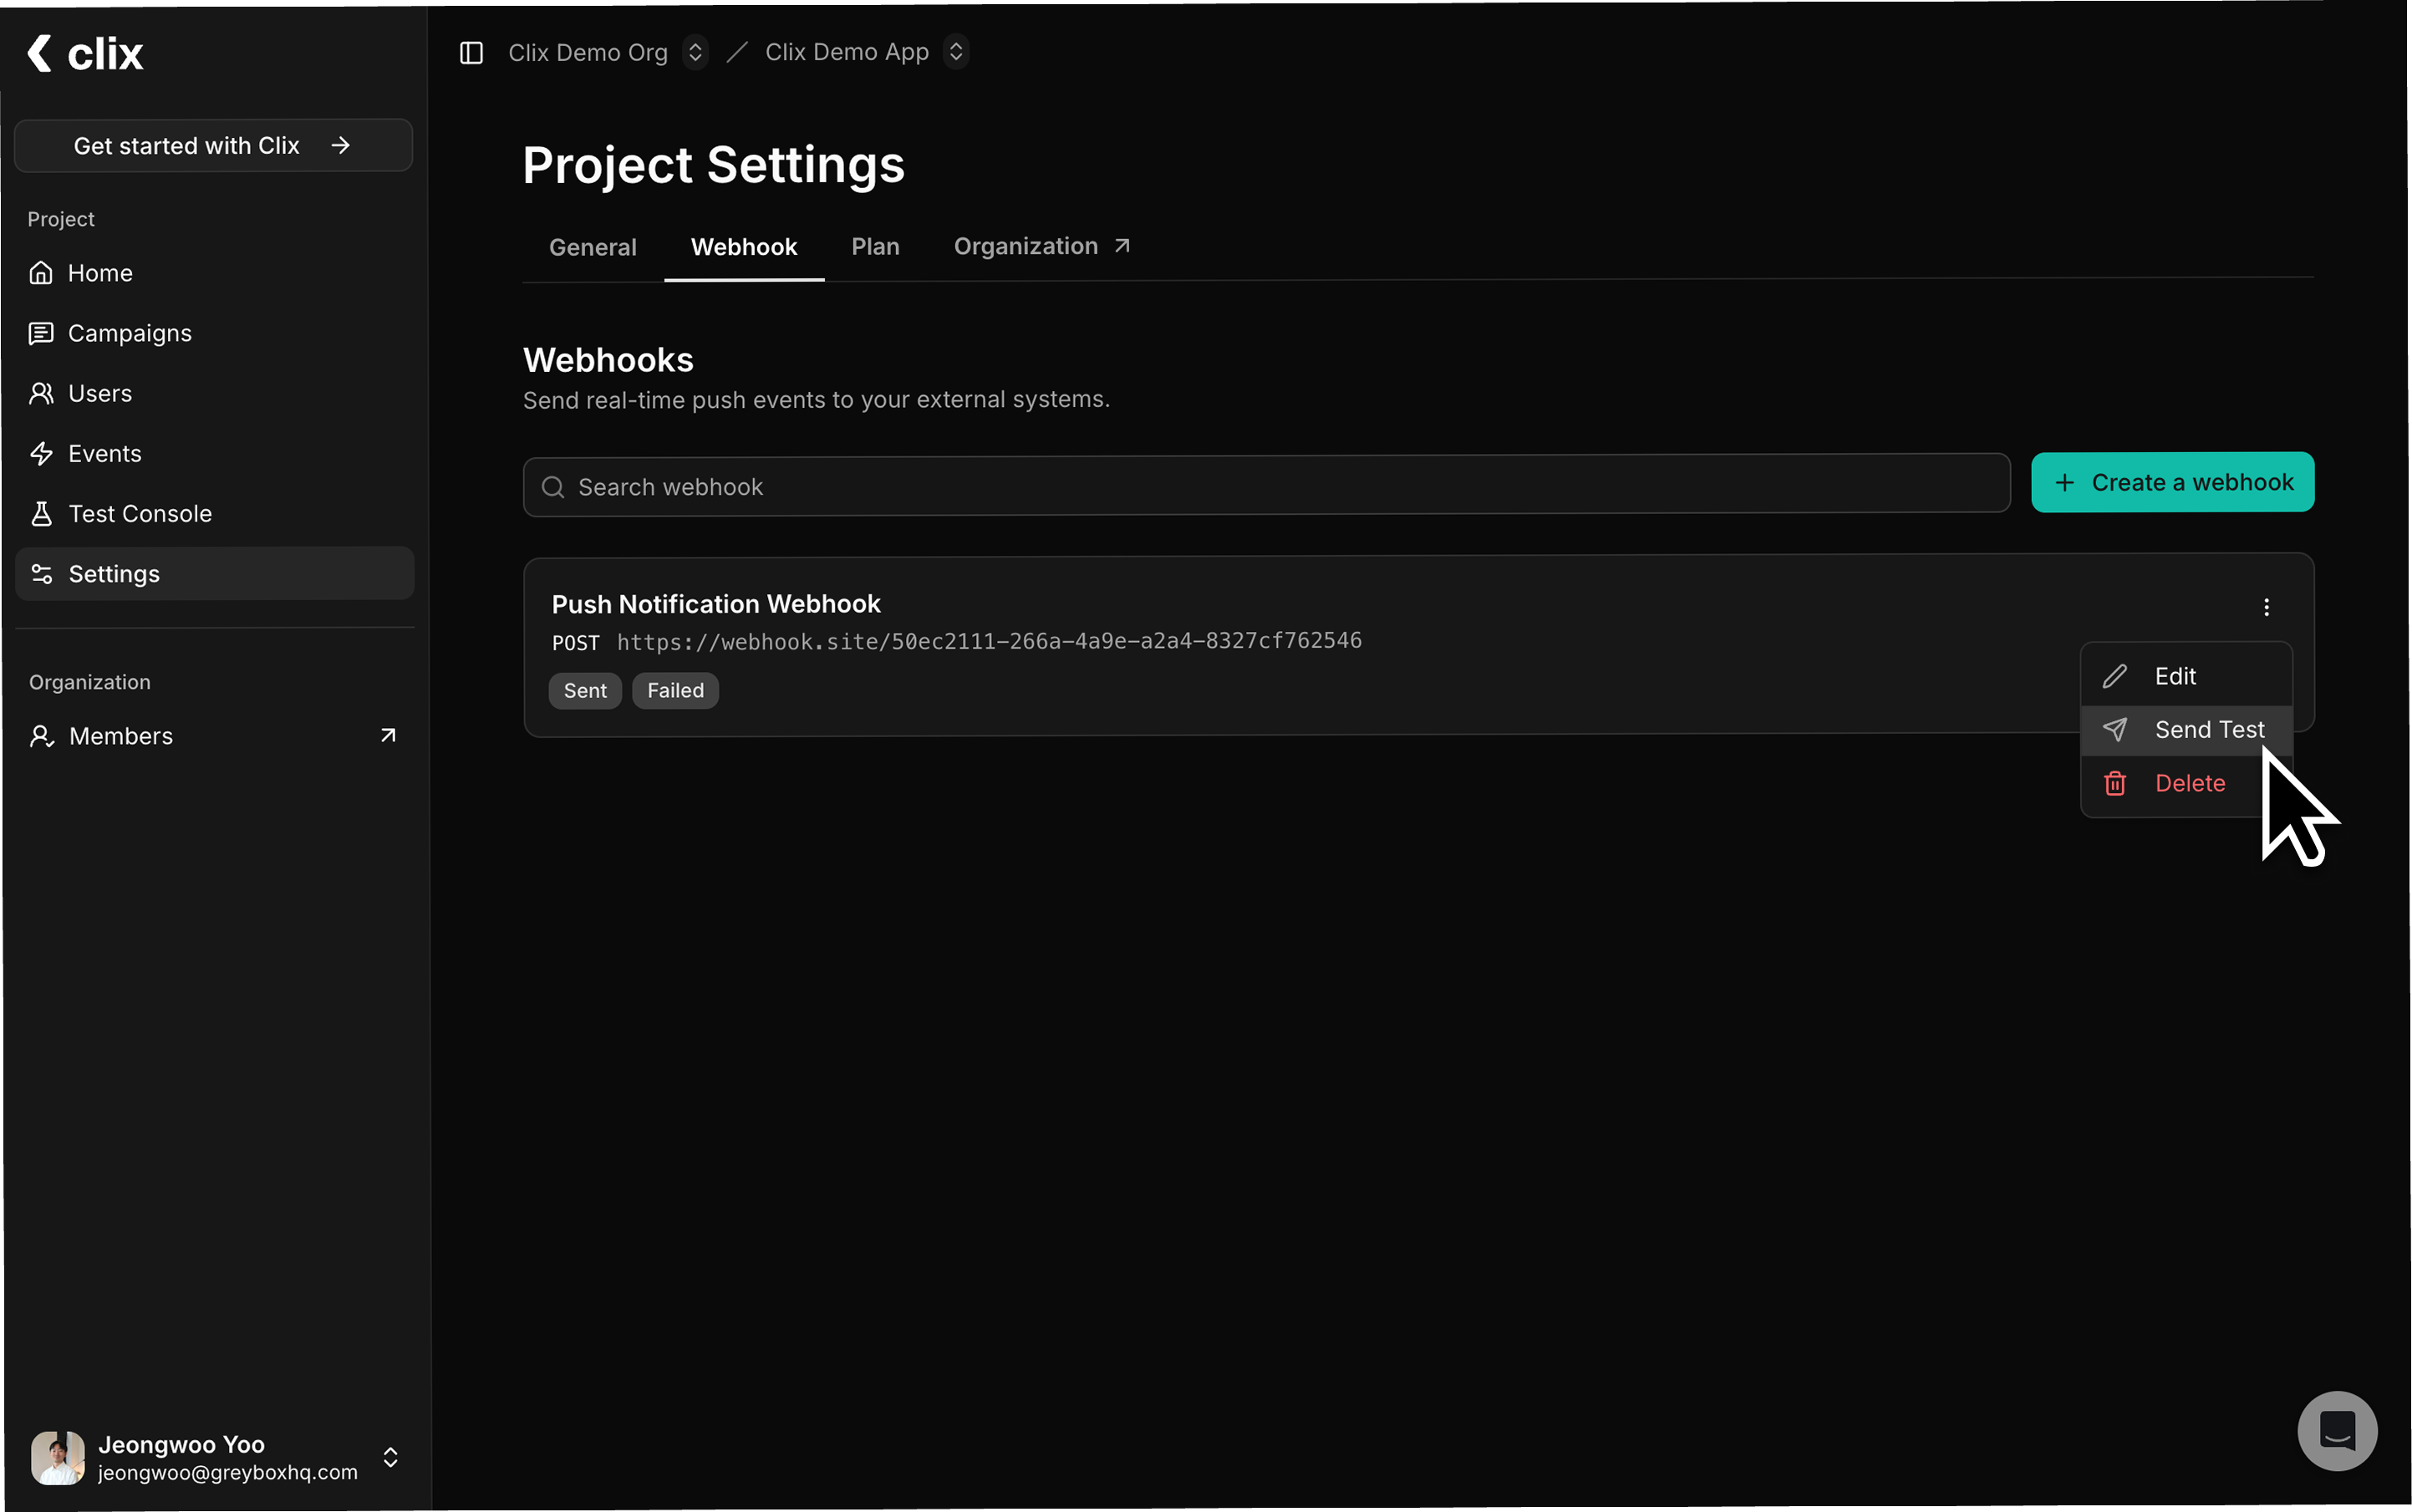
The webhook management page displays Sent and Failed status counts for each webhook. Click on a webhook to view detailed delivery logs, which can help troubleshoot common failures such as connection timeouts, invalid SSL certificates, non-2xx responses, or connection refusals.
Fill in the following fields:
Enter a descriptive name to identify this webhook (e.g., "Production Analytics Webhook").
Select which push notification events should trigger this webhook:
* **Sent**: Triggered when a push notification is successfully delivered to the device
* **Failed**: Triggered when a push notification fails to be delivered
You can select one or both events based on your needs.
Configure the HTTP request details:
* **HTTP Method**: Currently supports POST
* **Webhook URL**: Enter your endpoint URL (must be a valid HTTPS URL)
* **Timeout (ms)**: Set the maximum time (in milliseconds) to wait for a response from your endpoint. Default is 5000ms (5 seconds).
Add custom HTTP headers if your endpoint requires authentication or specific content types:
* Click **"+ Add Header"** to add a new header
* Common headers include:
* `Content-Type`: `application/json` (automatically included)
* `Authorization`: For API key or bearer token authentication
* Custom headers for your application logic
### Step 3: Save and Activate
Click **"Create Webhook"** to save your configuration. The webhook will immediately start receiving events based on your selected triggers.
## Webhook Events
### Event Types
#### Sent Event
Triggered when a push notification is successfully sent to a device.
**Payload Example:**
```json theme={null}
{
"project_id": "YOUR_PROJECT_ID",
"event_type": "PUSH_SENT",
"timestamp": "2025-12-16T07:42:54.168140781Z",
"message_id": "abcdefgh-b3f9-7950-9b24-abcdefgh",
"device_id": "abcdefgh-9171-4292-8382-abcdefgh",
"platform": "ANDROID",
"notification": {
"title": "👋 Hello from Clix!",
"body": "This is a test message to check your push setup 🚀",
"image_url": "",
"landing_url": ""
}
}
```
#### Failed Event
Triggered when a push notification fails to be delivered.
**Payload Example:**
```json theme={null}
{
"project_id": "YOUR_PROJECT_ID",
"event_type": "PUSH_FAILED",
"timestamp": "2025-12-16T07:44:49.325936806Z",
"message_id": "abcdefgh-759f-7291-8968-abcdefgh",
"device_id": "abcdefgh-62bc-4ddf-9adc-abcdefgh",
"platform": "ANDROID",
"notification": {
"title": "👋 Hello from Clix!",
"body": "This is a test message to check your push setup 🚀",
"image_url": "",
"landing_url": ""
}
}
```
### Response Requirements
Your endpoint should:
* Respond with a `2xx` status code (200-299) to acknowledge receipt
* Respond within the configured timeout period
* Return a response as quickly as possible (ideally under 1 second)
## Test Webhooks
The webhook management page displays Sent and Failed status counts for each webhook. Click on a webhook to view detailed delivery logs, which can help troubleshoot common failures such as connection timeouts, invalid SSL certificates, non-2xx responses, or connection refusals.
 ## Best Practices
To ensure reliable webhook delivery, use HTTPS endpoints with authentication headers, respond quickly (under 1 second ideally) and process data asynchronously, implement idempotency using `message_id` to handle duplicates, set appropriate timeouts, log all requests for debugging, and test your configuration thoroughly using tools like webhook.site before going live.
## Troubleshooting
If webhooks are not being received, verify your endpoint URL is publicly accessible, check firewall settings, and ensure SSL certificates are valid. For high failure rates, confirm your endpoint responds within the timeout period with 2xx status codes.
## Need Help?
If you encounter issues setting up webhooks or have questions about webhook events, please contact our support team or visit our documentation portal.
## Best Practices
To ensure reliable webhook delivery, use HTTPS endpoints with authentication headers, respond quickly (under 1 second ideally) and process data asynchronously, implement idempotency using `message_id` to handle duplicates, set appropriate timeouts, log all requests for debugging, and test your configuration thoroughly using tools like webhook.site before going live.
## Troubleshooting
If webhooks are not being received, verify your endpoint URL is publicly accessible, check firewall settings, and ensure SSL certificates are valid. For high failure rates, confirm your endpoint responds within the timeout period with 2xx status codes.
## Need Help?
If you encounter issues setting up webhooks or have questions about webhook events, please contact our support team or visit our documentation portal.